Show Off! Frame your photos in Photoshop
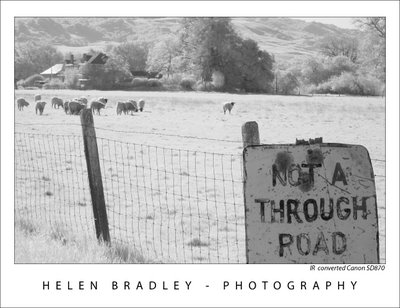
When you’re displaying your photos on a blog or a website you'll want them to look as good as they would if you had them framed on the wall. Here is a Photoshop technique for adding a frame, complete with your name and photo details, to a photo.
To see what we are aiming for, compare the two images below. The photo on the left is unadorned and the one on the right has been framed using the process outlined in this step by step. This frame gives the photograph a very smart and professional look. 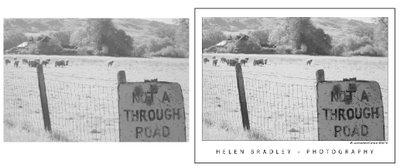
Here’s how to achieve this: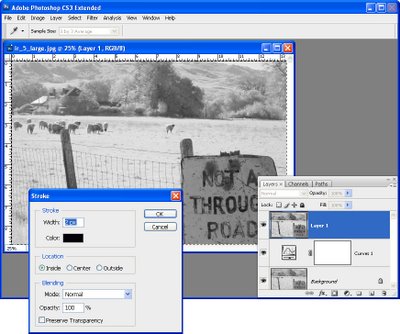
Step 1
Once you have finished editing your photograph in Photoshop, click the topmost layer of the image and press Ctrl + Alt + Shift + E (Command + Option + Shift + E on the Mac), to create a new layer containing a merged version of the image.
Click this new top layer and choose Select > All and then Edit > Stroke. Set the Width to 2 pixels, the Color to black and select Inside and click OK. This adds a keyline around the image and makes sure that any white areas in the photograph do not bleed into the frame. Adjust the stroke width to match your image size - larger images can handle a wider stroke whereas small images may need only a 1 pixel stroke. Choose Select > Deselect or press Control + D (Command + D on the Mac). 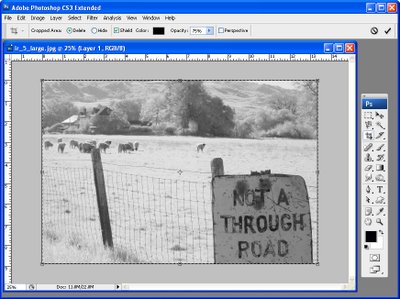
Step 2
Enlarge the Photoshop image window by dragging on one corner. You want to see some of the gray edge around the photo. Set the background color to the desired frame color. Click the Crop tool, select the entire photo and let go the mouse button.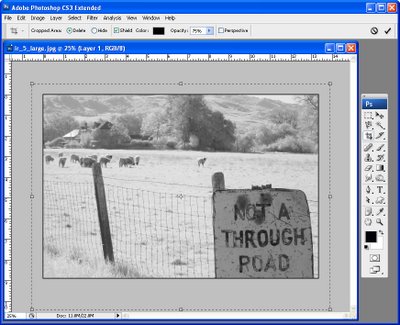
Step 3
Hold the Alt key (Option on the Mac) and drag on the left or right side of the crop marquee outwards into the gray area of the image. What you're doing is marking the amount of space that you want for a frame around the left and right areas of the image.
Repeat using the Alt key (Option on the Mac), on the top or bottom border to create a matching amount of space above and below the image. Now, without holding down any other keys, drag the bottom border downwards to create a larger space at the bottom of the image.
Double click on the crop selection and this extra area you have marked out will be added to your photograph. If your image had a background layer the color is added to the background. If your background layer had been previously converted to a regular layer, the extra area will be transparent. If the area is transparent, add a new layer by choosing Layer > New > Layer and fill it with white or your chosen frame color by choosing Edit > Fill and choose the color to use from the Use list. Drag this layer underneath your topmost photo layer. 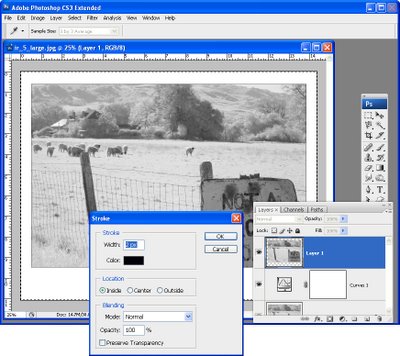
Step 4
Select the topmost layer, choose Select > All and then Edit > Stroke and add another 2 pixel black stroke on the Inside of the selection. Choose Select > Deselect or press Control + D (Command + D on the Mac). 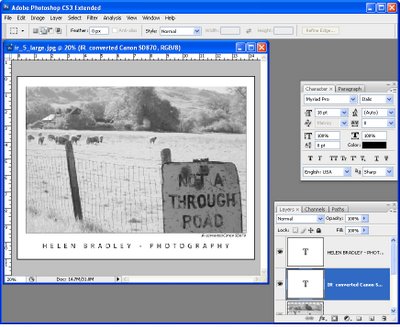
Step 5
Click the Horizontal Type tool and select a relatively plain font such as Myriad Pro, black color and type your name below the photo. For example, I use "Helen Bradley – Photography". To widen the spacing between the font characters so they fit better across the screen, select the text and press Alt + Right Arrow (Option + Right Arrow on the Mac). To center the text below the image, select the text and the image layer and choose Layer > Align > Horizontal Centers.
If desired, add the photo title and date captured on the right hand side underneath the photograph in the same font face but a smaller font size. This time, don't stretch the characters apart and use an Italic font if desired. Align the last character in the title with the edge of the image.
Step 6
You're now ready to save a version of this image as a JPEG file for web display.
Tip
Choose a 'frame' color that works for your images, you can use an off white color rather than white or reverse the colors and use white keylines and type, and a black frame. Whatever choice you make, it will ensure your photos are readily identifiable if you consistently use the same design for all your images.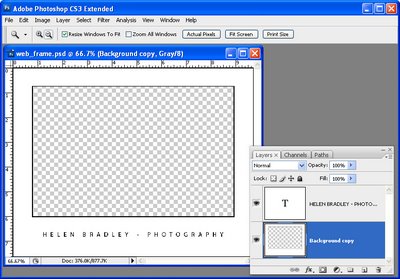
Tip
If you are preparing a series of images to display on the web, you can create a frame shape with the keylines and type already in place on the frame layer and with a cutout area for the photograph to appear in. Save the frame image as a PSD or layered TIFF file ready for use. Open the frame and your finished photo. Flatten your photo image to a new layer using Control + Alt + Shift + E (Command + Option + Shift + E on the Mac) and drag this new layer underneath the "hole" that you have cut out of the frame image and size the image to suit. Save the framed version and repeat as required. When you have a lot of images to process and if you're prepared to loose a little of the image edges for the sake of speeding up your workflow, you will find that adding an image to a frame is quicker than creating the frame for each image separately.
I blog for the online Digital Photography School and this post first appeared here Digital-photography-school.com.
Labels: frame photos, Photoshop

2 Comments:
Awesome - thank you!!!
THANKS FOR THIS AWESOME TIP. I AM GLAD THAT I FOUND YOUR BLOG.
DONALD
Post a Comment
Subscribe to Post Comments [Atom]
<< Home