Articles | Photography Blog | Office Tips Blog | about me | e-mail

Helen Bradley - Photoshop and Lightroom tips and techniques

Sunday, August 23, 2009

Smart Dodge and Burn in Photoshop Elements
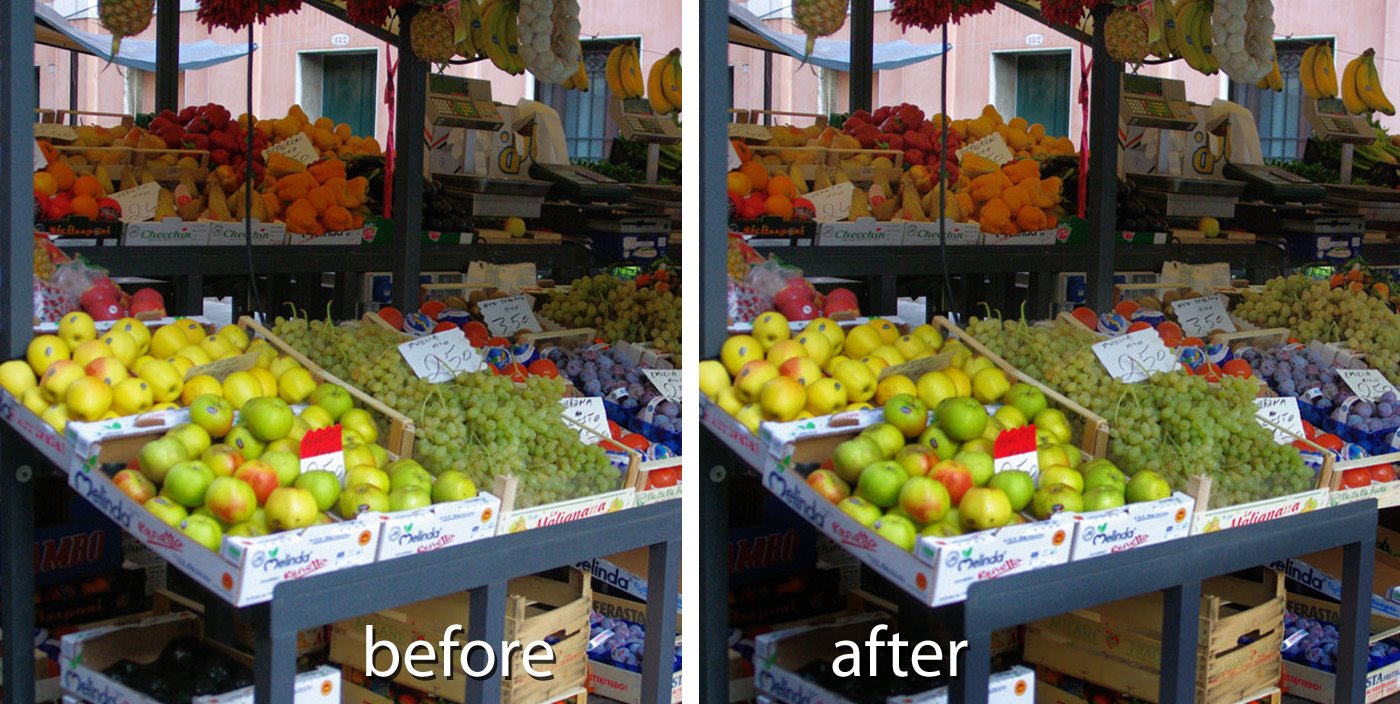

In the traditional darkroom, you could adjust the relative lightness or darkness of parts of an image using processes called dodge and burn. If you were dodging or lightening the image you would expose parts of the image for a shorter length of time to lighten them. If you wanted to darken a portion of the image you would expose it for a longer period of time so that more light would be applied to the photo paper with the result that you would be darker.

The terms dodge and burn continue to be used in software today and Photoshop Elements has a Dodge tool and a Burn tool which are both accessible from a toolbar position which they share with the Sponge tool. The disadvantage of using the Dodge and Burn tools as they are shipped with Photoshop Elements and, indeed Photoshop, is that these fixes are designed to be made to the original image and the cannot be made on a separate layer and then, for example, be blended into the image.

The result is that if you apply a Dodge or Burn fix and later determine that you do not like the result or want to adjust it, it will be difficult to undo the changes that you have made.

In post production, dodging and burning are best applied to a separate layer in the image so that they can be undone, edited or blended at a later date.

Here is a method dodge and burn an image in Photoshop Elements which works the same way in Photoshop. It involves creating a layer on which the dodge and burn process is performed. It also takes advantage of a special characteristic of the Soft Light blend mode. This is a different dodge and burn method to that which Food blogger Danny Jauregui used in his recent post.


Step 1
Open your image in Photoshop Elements (or Photoshop) and add a new layer by choosing Layer > New > Layer and click Ok.

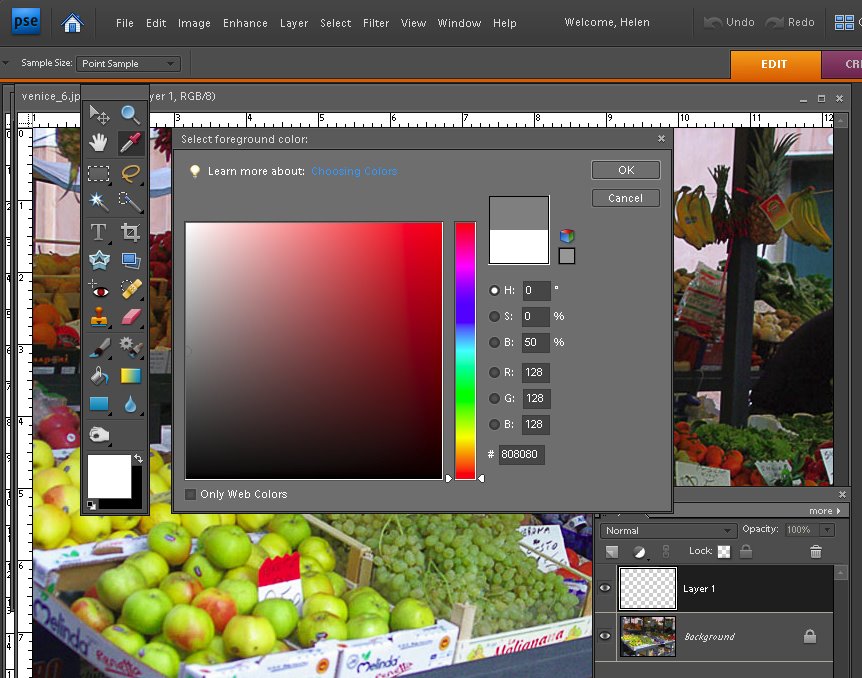
Click on the foreground color swatch and set the R, G, and B values each to 128 and click Ok.


Step 2
Click the Paint Bucket tool in the tool list and click on the image to fill the layer with the gray color. You can also press Alt + Backspace (Option + Delete on the Mac) to fill the layer with the foreground color.


Step 3
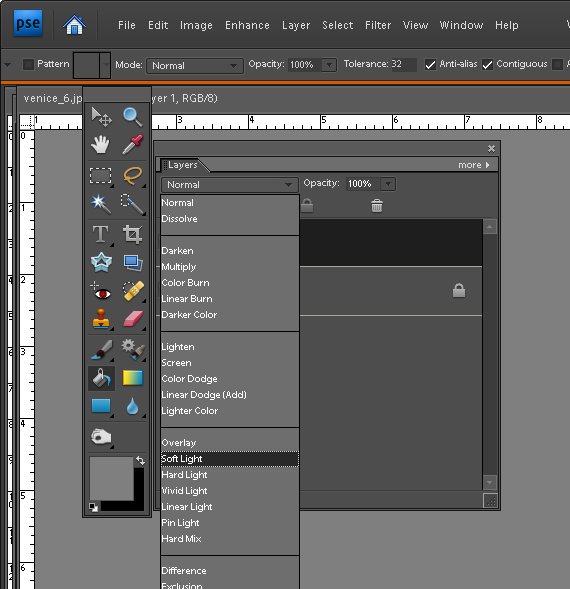
Set the layer's blend mode to Soft Light. The result will be that you will see your image just as it was when you opened it.

The Soft Light blend mode can be used to lighten or darken an image. If the color on the top layer is darker than neutral grey the image on the layer below is darkened and if it is lighter than neutral grey the layer below is lightened. When you blend with neutral grey, nothing happens. Here we have filled the layer with neutral gray (each of the RGB values are 128) so you see no change to the image.

So, if we now paint on this top layer with white the image will be lightened and if we paint with black it will be darkened. This is the equivalent of dodging and burning on the image.


Step 4
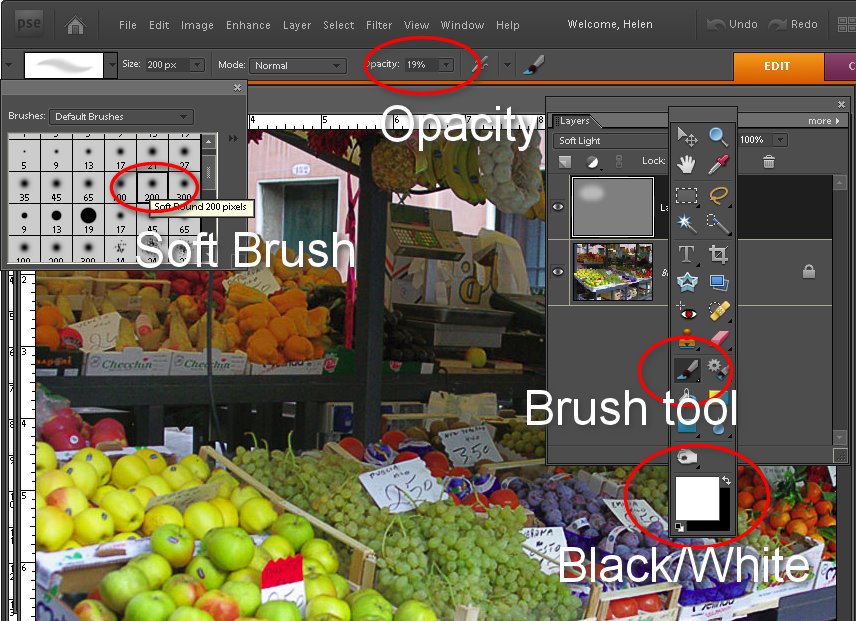
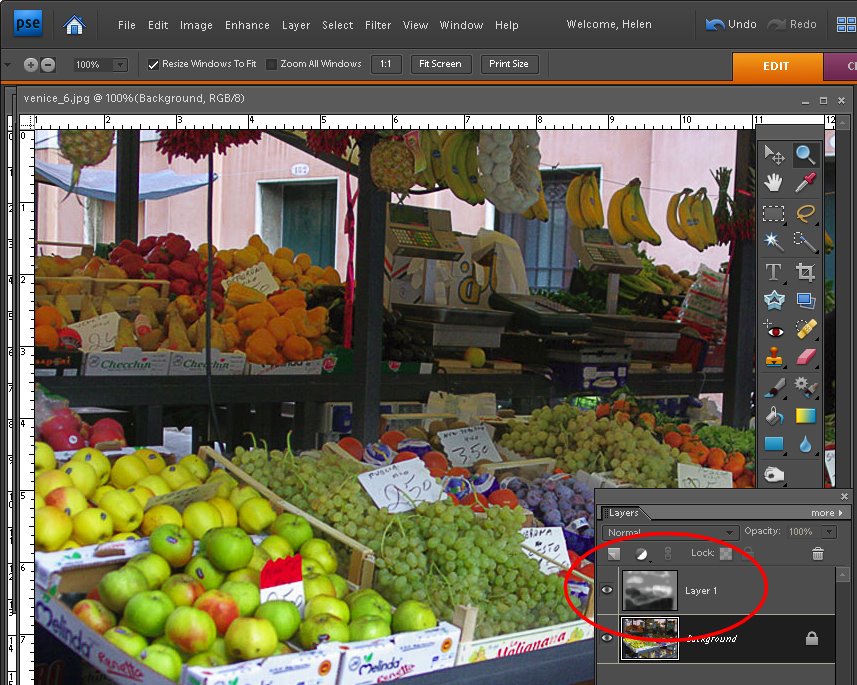
Select the Brush tool and select a circular soft edge brush adjusting its Opacity to around 25 percent. Adjust its size by pressing the [ or ] key on the keyboard. Set the foreground and background colors to white and black by pressing the D key and then the X key. Paint over the image on this top layer in white in those places that you want to lighten the image below.

For those parts of the image that you want to darken, paint over them with black.

If desired you can create one layer for burning and a second one for dodging. This will allow you to alter the opacity of each layer separately so you can subtly adjust the strength of the lightening or darkening applied.

To ensure that the fix remains changeable, save your image in a format that saves the image layers such as .psd.

Labels: , , , ,

Sunday, March 08, 2009

Photoshop - change the color of your house


You can change the color of anything using Photoshop. A friend of mine is about to paint her house but before her husband goes shopping for paint, she wants to know that the result will look good and that the house will blend nicely with its surroundings. It's a job for a digital camera and some Photoshop know-how. Here's how to recolor your house (or anything else) and save color combinations to review with someone else later on. I've used Photoshop CS3 but almost any version will do.

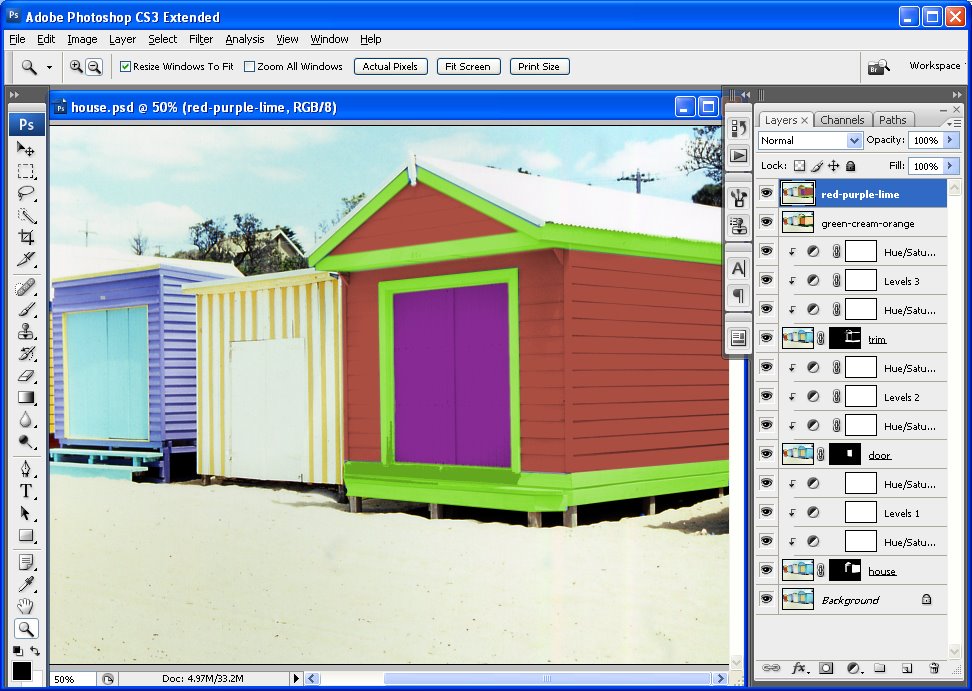
Open a photo of your house in Photoshop. I've used a bathing box for simplicity but the principles are the same for a house or, indeed, anything at all. You'll need one extra copy of the background layer for each item you'll recolor. For this image I've duplicated the background layer three times so I have a background layer, a layer for the house color, one for the door color and one for the trim and I’ve named them appropriately.

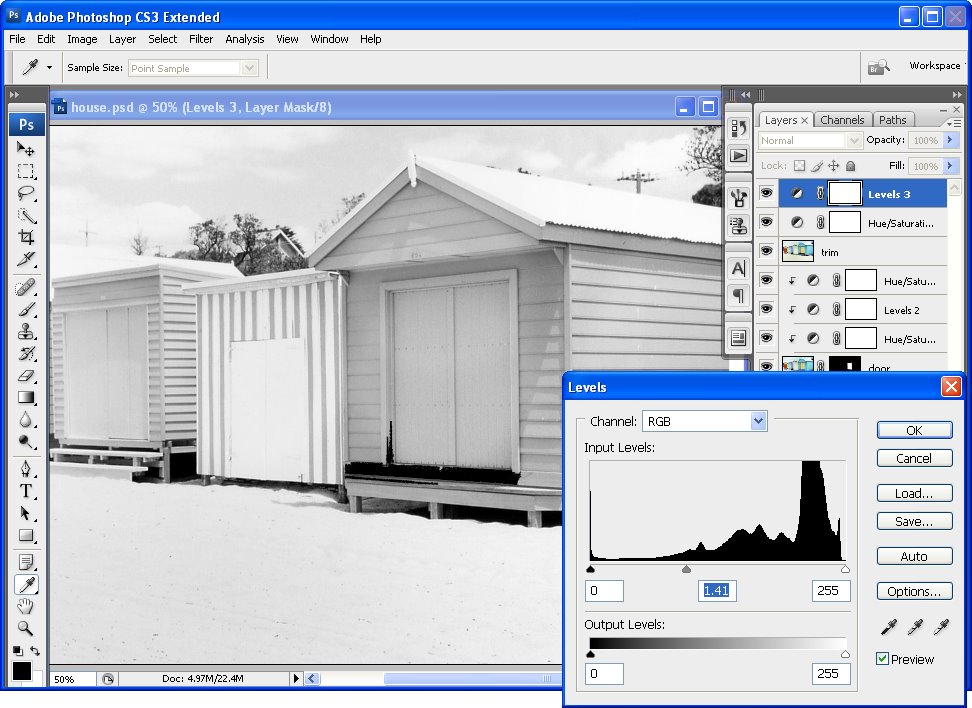
Start with the house layer and hide the others. Choose Layer, New Adjustment Layer and add a Hue/Saturation adjustment layer and drag the Saturation slider to -100 and click Ok. Add a second adjustment layer by choosing Layer, New Adjustment Layer, Levels and adjust the sliders until the area you’re focusing on looks like it could be painted with white paint. You want to retain the detail but lighten the area. Ignore everything else in the image for now. Click Ok when you're done.

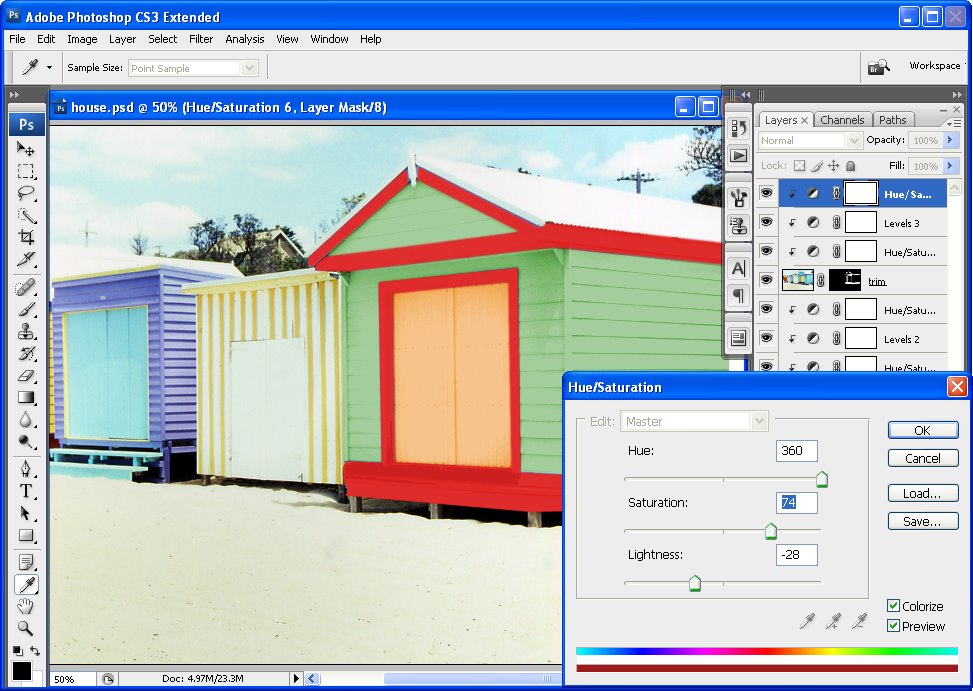
Now add a third adjustment layer using Layer, New Adjustment Layer, Hue/Saturation. Click the Colorize option and adjust the Hue, Saturation and Lightness sliders until you have the color that you want for the area you are working on. Again, ignore the effect on the rest of the image. Click Ok when you're done.

Now, to limit the effect to the area you want painted in this color, select the adjustment layer just above the layer you're working with and choose Layer, Create Clipping Mask. Repeat for the other two adjustment layers. You should see the adjustment layers indented in the Layers palette. Now, you can paint on the color. Select the layer you're working on, in my case this will be the layer named house and hold Alt as you click on the Add Layer Mask button at the foot of the Layer palette. This creates a Reveal All layer mask so your photo should now be its original color.

Select white as your foreground color and paint over the areas you want to be coloured with the color you just selected. If you paint over something by mistake, switch to black foreground color and paint the original color back.


Step 1
For each area of color in the image, add the same three adjustment layers, one to remove the color, one to adjust the lightness and one to add color back. Create the adjustment layers as a clipping group with the appropriate layer. Finally, add a layer mask and paint the effect onto an area to recolor it.


Step 2
Because you will use adjustment layers for all the changes, you can alter the settings at any time if desired. Simply double click on the Adjustment layer thumbnail and the dialog will open so you can make changes to its settings and then click Ok to reapply it to the image.


Step 3
To save a color scheme, add a new layer at the top of the Layers palette, select it and press Control + Shift + Alt + E to create a new merged layer. Name this and turn its visibility off. Now change the colors to test a different look and save that version the same way.

Labels: , , ,

Wednesday, November 28, 2007

Paris Rooftops


Ok, so there is this really cool place in Paris to shoot from. It's called the Montparnarse Tower - it's in Montparnarse (duh) and it's this big office building. The beauty of it is that it has a rooftop area you can visit and it doesn't cost a heap. It also has breathtaking 360 degree views of Paris all the way to the Eiffel Tower and across the Seine.

Ok, so they can be breathtaking views if it isn't foggy and smoggy. Memo to self: don't go there early in the morning before the wind has blown the mess away.

The Eiffel Tower could be seen, just!

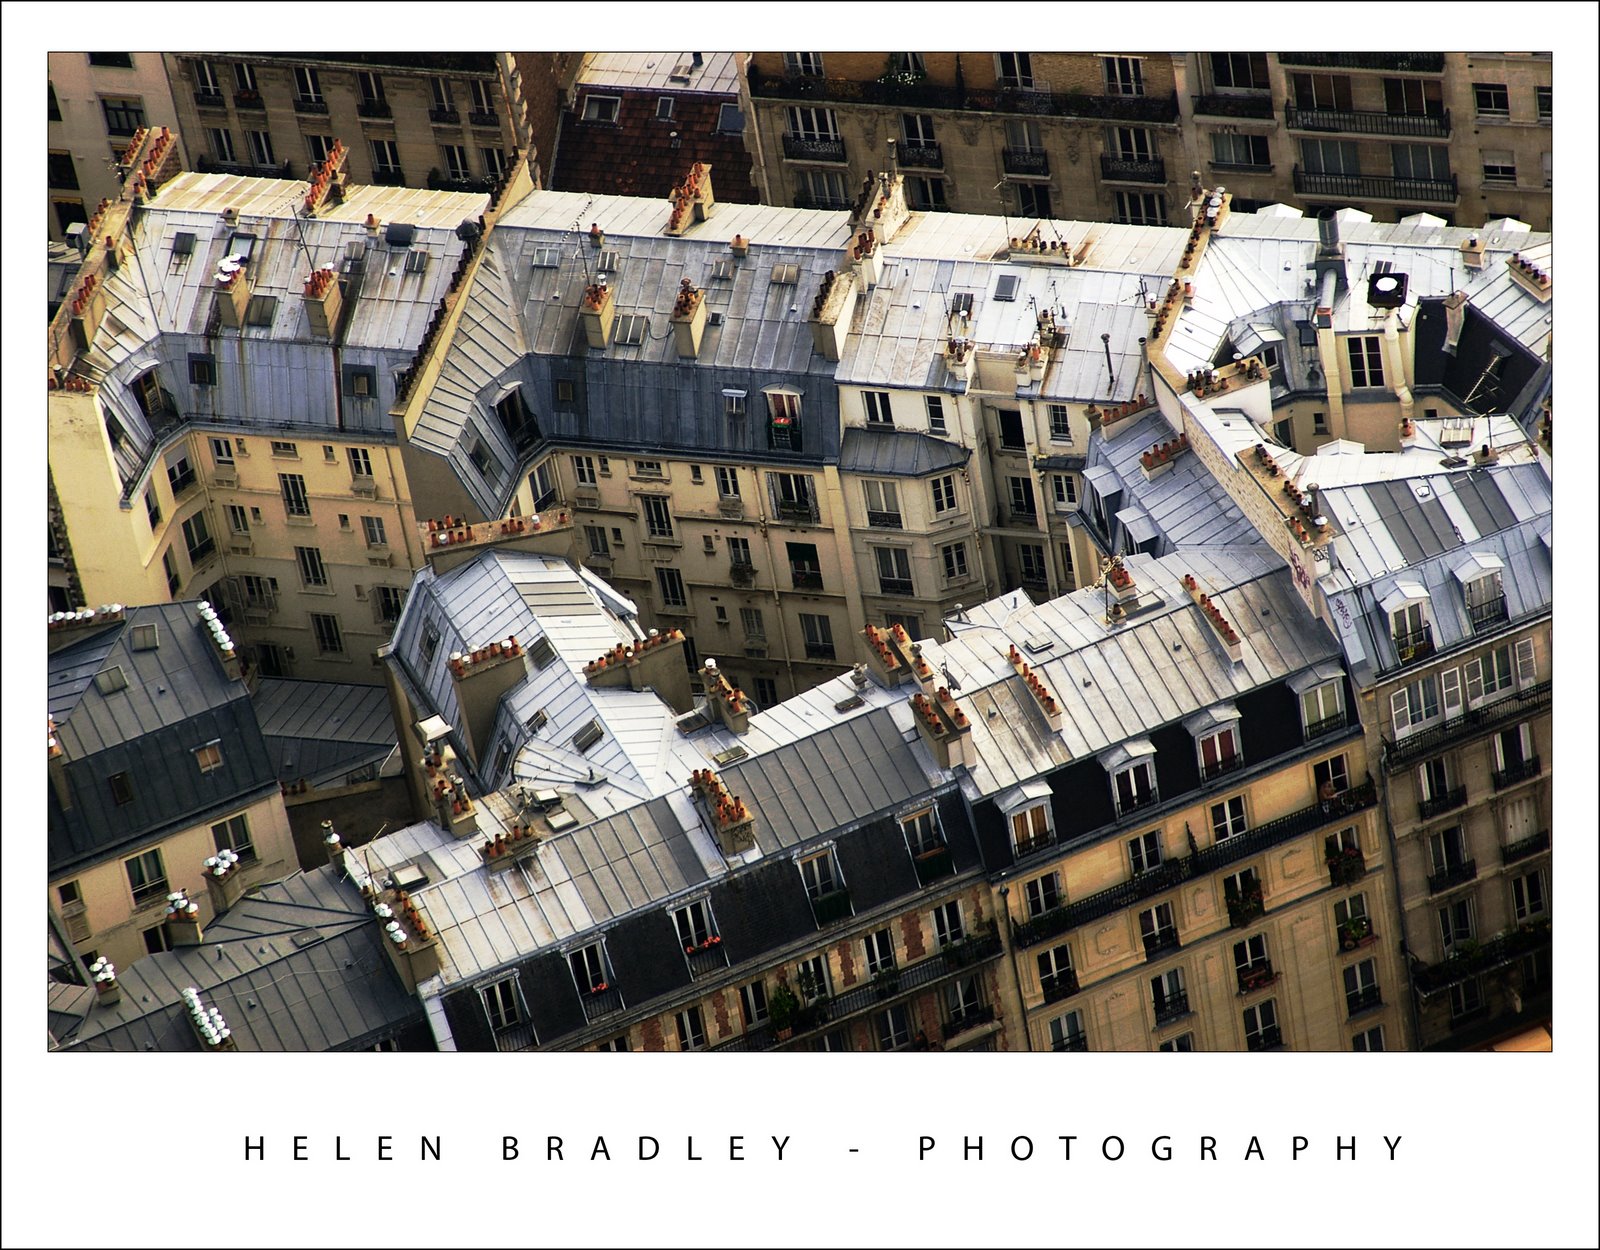
Here is one of the photos I took of the rooftops in Paris from the tower. The poor air quality killed the color so there was precious little to recover and the overall image was muddy. The solution was to duplicate the image a few times and then drag bits and pieces of color and detail back out of it. The light roofs were a big issue, fix the tonal range enough to fix the image and the gorgeous detail in the roofs disappeared.

The solution is to fix the image multiple times on multiple layers. On each layer, focus on a specific detail. Then clobber the whole lot together again using Layer Masks you just paint on the bits you want and paint out those you don't.

Labels: , ,

Tuesday, November 20, 2007

Metro - Paris


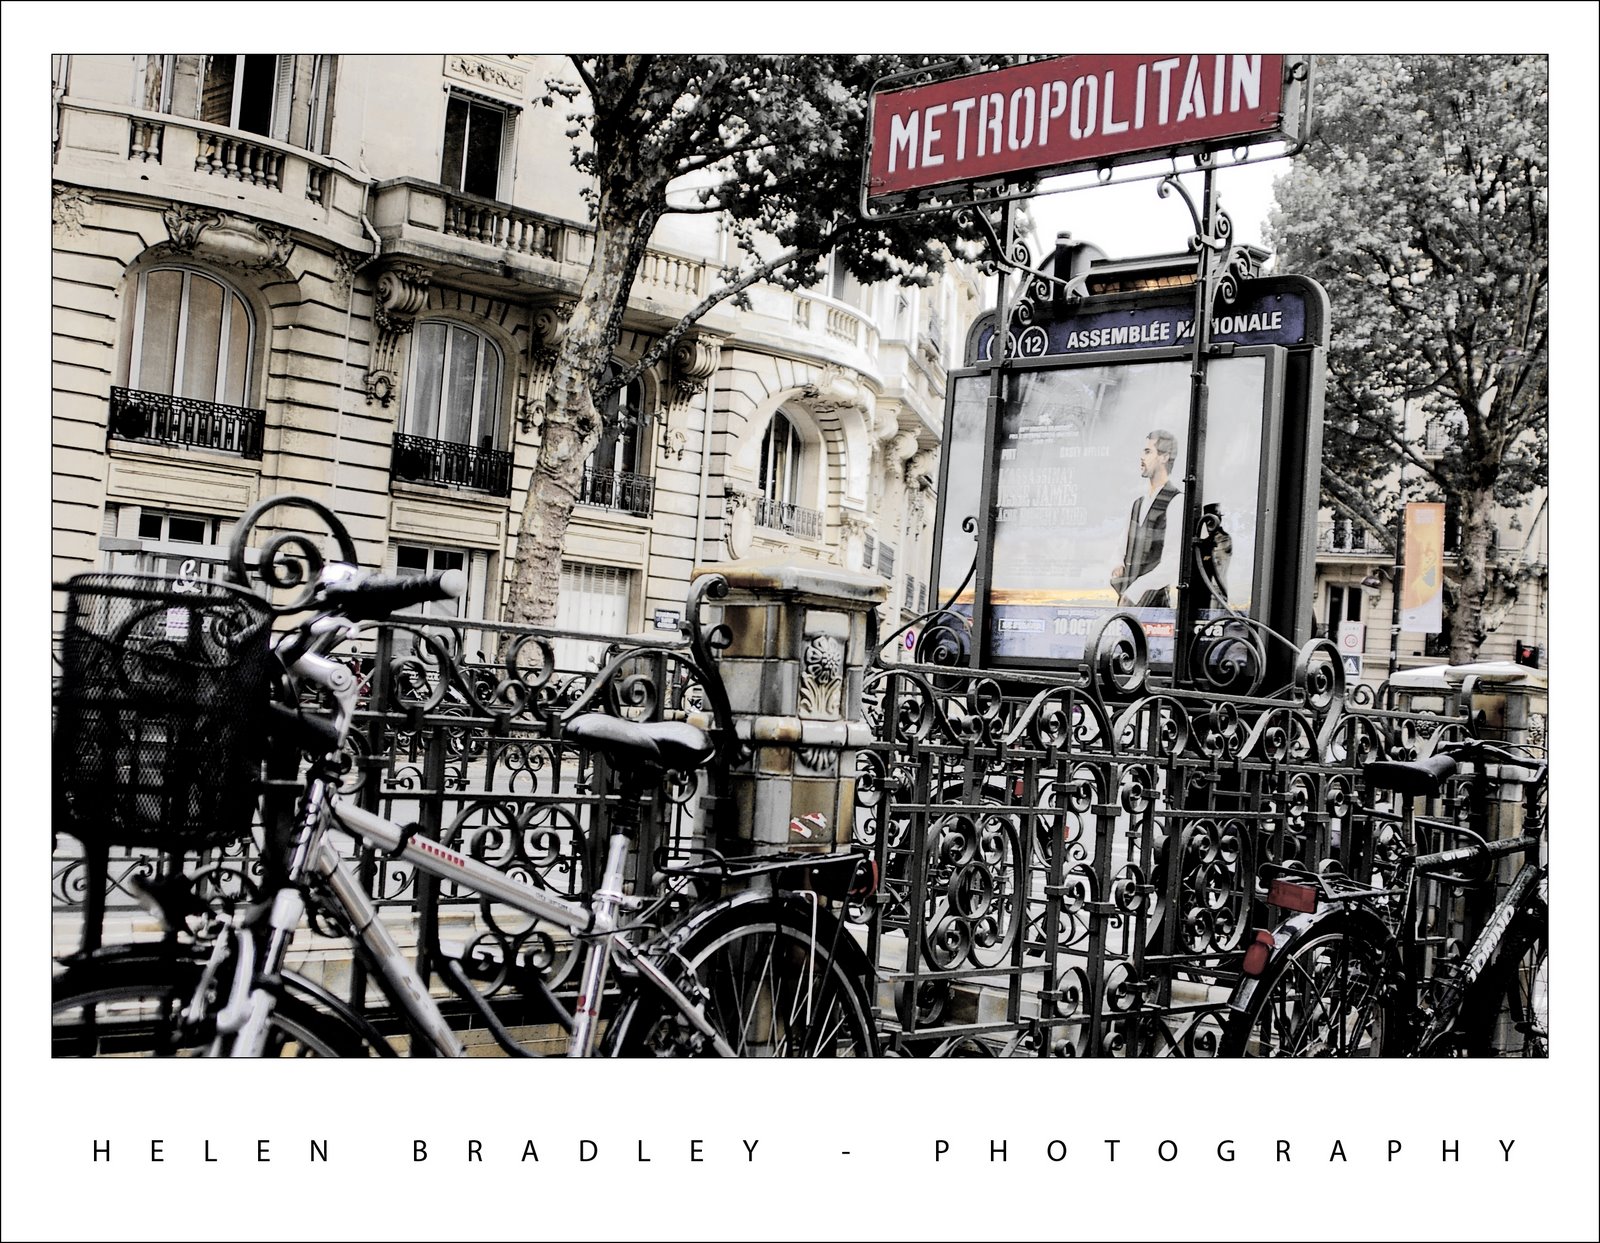
This was one of my favourite shots of the Paris metro stations. It was a throw away shot - I just took it walking past because I loved the bikes around it and there weren't many people around.

I dumped most of the color in the photo as it just looked so good when you look at the blacks and whites in it.

I duplicated the background layer and turned the top layer into a black and white using the new Photoshop Black and White adjustment layer which lets you select which direction to take each colour into. It's way more sophisticated than anything we've had in the past. Then I adjusted the opacity of the layer a little to show some of the colors from the layer underneath. The result is an almost ethereal photo. I've put it on a white tee shirt at CafePress in my store if you like it and want to wear it.

Labels: , , ,

Friday, November 09, 2007

Rooftops in the rain - Brighton


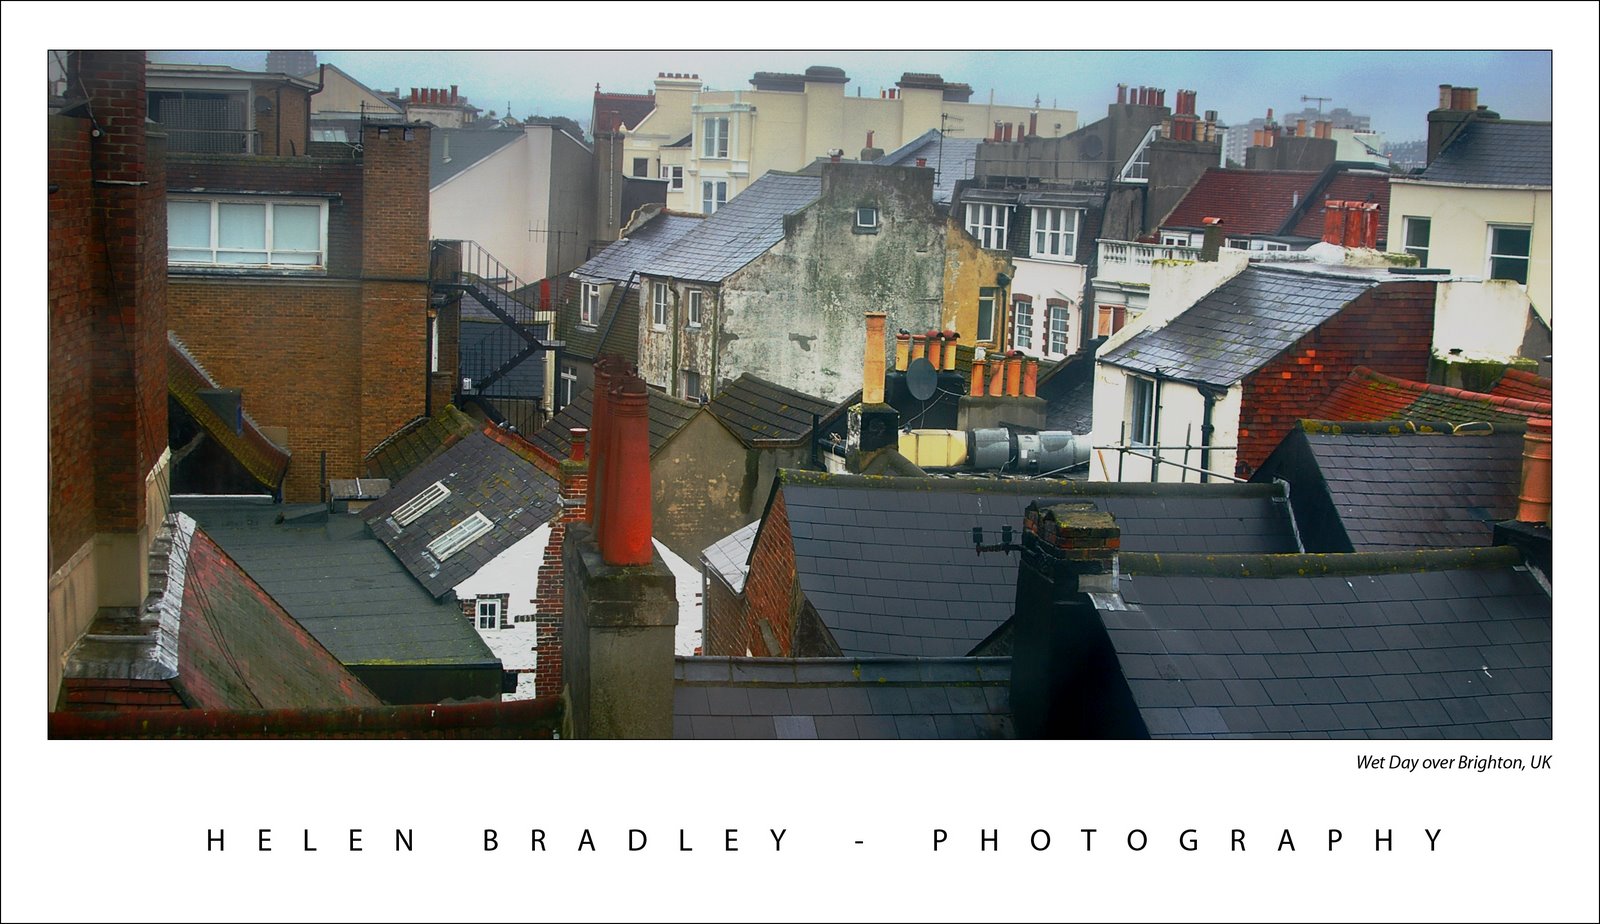
When I was in Brighton we had one beautiful summer like Sunday when everyone was walking along the beach and it was all so gorgeous and then, next day, it rained cats and dogs.

Here's a photo I took from my hotel room window across the roofs of Brighton the day it rained. I don't think the windows of the Queens Hotel had been washed since good ol' Queen Vic gave her name to the hotel so they were pretty interesting to shoot through and, of course, they only opened 6in from the bottom so shooting through the gap was impossible.

The original was flat and lifeless as one might expect. A Levels adjustment is a great starting point for a photo like this. Simply choose Layers, New Adjustment Layer and then choose Levels. Drag the little triangle sliders in from the left and the right till they are just under the places where the chart data begins and ends. This darkens the darks and lightens the lights and instantly boosts the tonal range in the image and gives it more contrast and life. The middle slider handles the midtones so you can drag it to the right or left as required for your image.

For the rest of this image I worked hard to get the colour and detail back. The cream buildings in the background were treated independently of everything else as they just kept getting lost in every solution I tried. Masks are great for this, fix one part of the image with adjustment layers, then hide the adjustment layer and work with another one focusing on the other part of the image. Then, use the mask on each adjustment layer to paint in or remove the fix from areas of the image. When I want most of the fix I just paint in black over the areas that I don't want the fix to be applied to. When I only want little bits affected by the mask, I fill the mask with black (white reveals, black conceals), then paint with a low opacity, soft white brush to bring back the fix in the small areas that it is needed.

I also used the Selected Color adjustment on this image, I'll talk more about it in a future blog post.

Labels: , , , ,

Wednesday, October 24, 2007

Port de Vanves market - Paris


We visited the Port de Vanves market in Paris. This funky market only happens on a Saturday and Sunday morning from 7:30am till around 1:30pm. It is really near a Metro station (tell me what isn't in Paris!) and it's not on the tourist beat so it's more French than you might expect. It was so much fun and I bought lots of little bits and bobs for my artwork. My mum bought me this cute paper mache horse which is hand made and which is on little wooden wheels - way too cute.

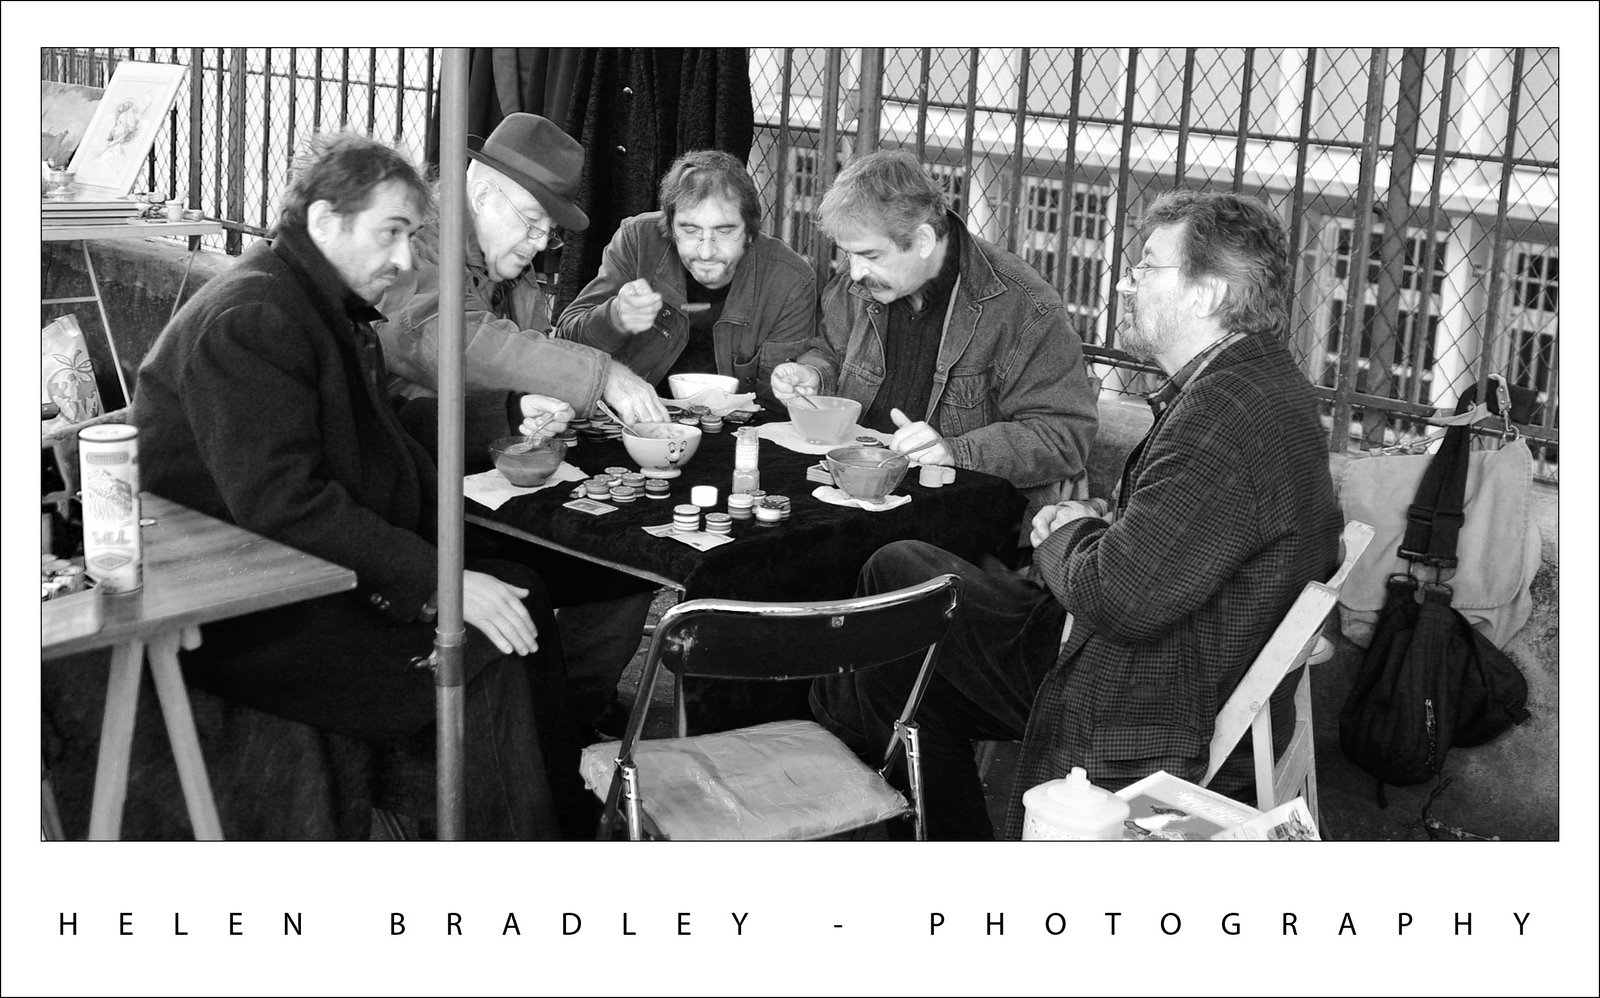
These five guys were stall holders who were taking time out to grab some lunch. They were so wonderful and kind to let me capture this photo.

This photo is a compilation of two I took. I aligned them using the new Photoshop Auto Align layers command and then masked out the bits I didn't want from the top layer. This let me use the best facial expressions for each person. I used the - new to Photoshop CS3 - Black and White adjustment layer to mix the black and white because this gives you the ability to select colours in the image and take them to black or white. The result is much richer image than I could create with, for example, the Hue/Saturation tool or even the Channel Mixer.

Labels: , ,