Articles | Photography Blog | Office Tips Blog | about me | e-mail

Helen Bradley - Photoshop and Lightroom tips and techniques

Friday, September 18, 2009

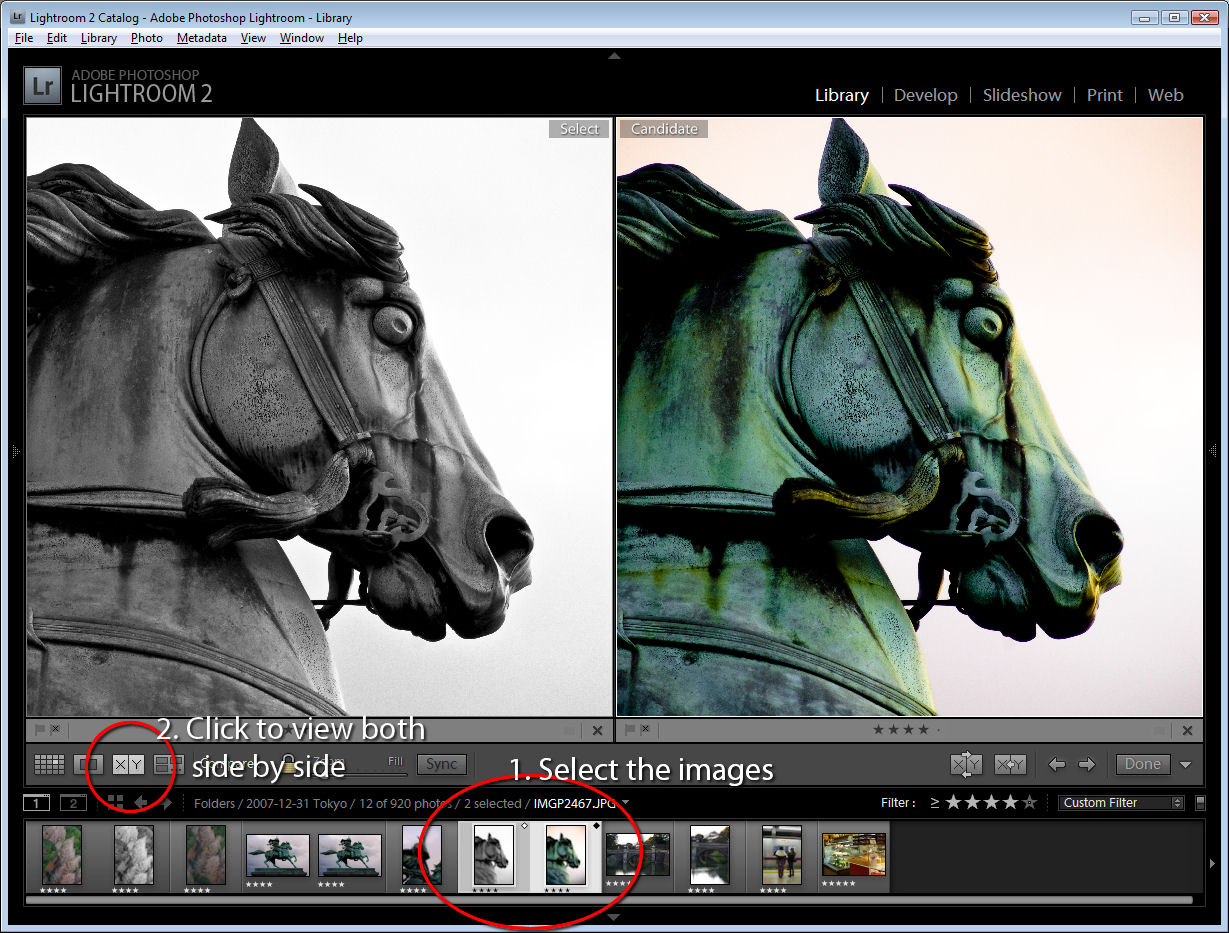
Understanding filters in Photoshop and PS Elements


When I was young, my dad told me that if at first you don’t succeed you should try and try again until you do. In today’s post, I am going to tell you why this adage relates to editing photos by working with filters in Photoshop Elements and in Photoshop.


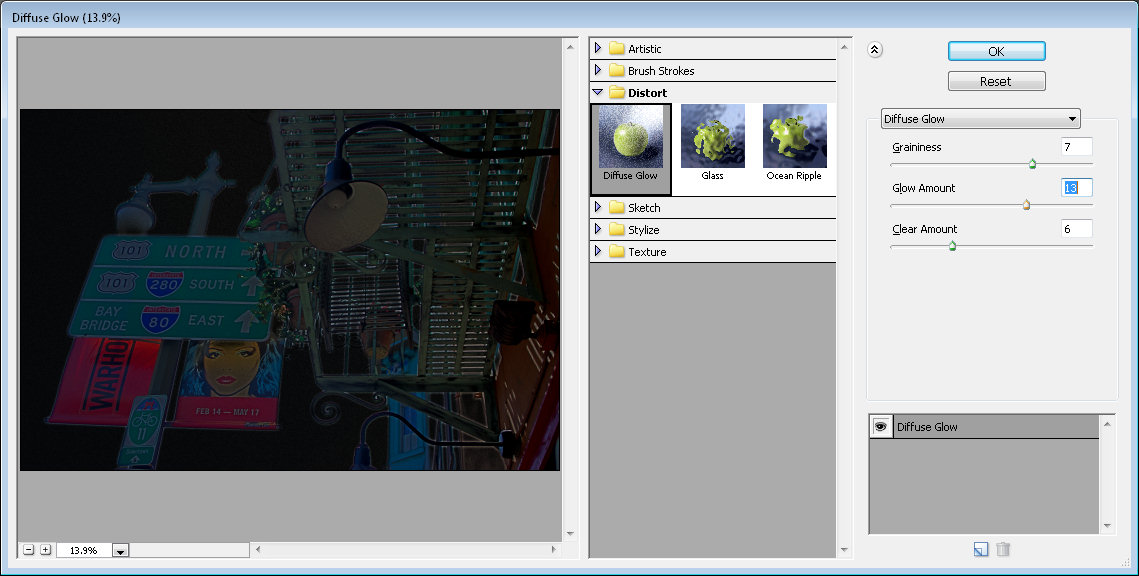
Not good! start with the wrong colours and filters suck, big time!

Step 1
Start by opening an image that you like, set the foreground color to white and the background color to black and choose Filter > Distort > Diffuse Glow. When you do this, the image will take on a rather nasty dark glow. There is pretty much nothing that you can do to this image that is going to make it look good. You can try to remove the graininess and glow and increase the clear amount to 20 but if you do that, you've effectively removed the filter effect. The short answer is it looks ghastly and you might be wondering just what you did wrong?


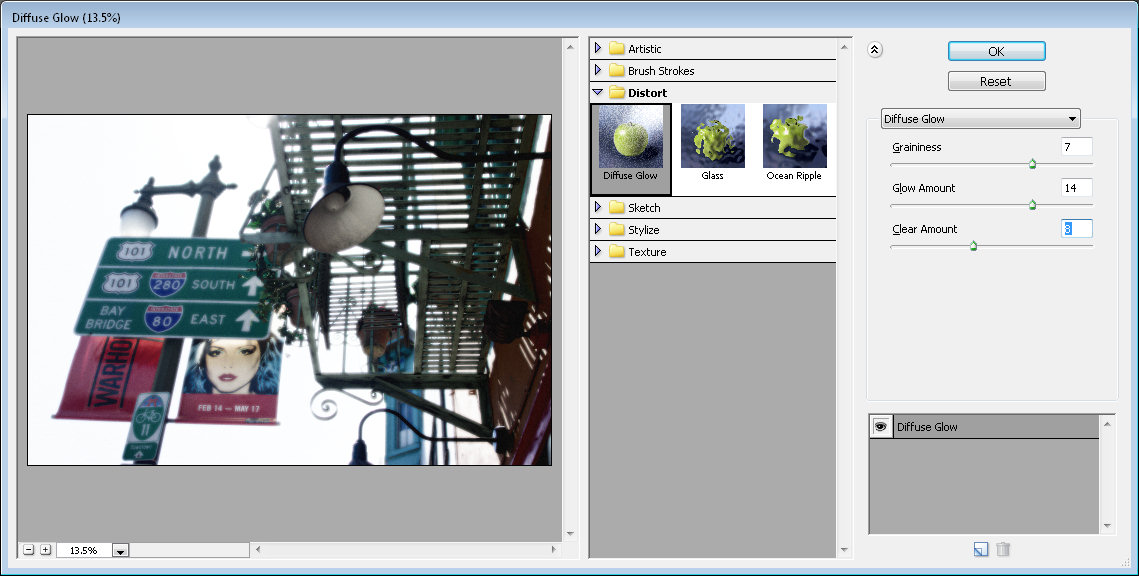
Same image, better result, it's the colors that are the difference

Step 2
Exit the Filter Gallery, switch the foreground and background colors so that black is now the foreground color and white is the background color. Reapply the filter using Filter > Distort > Diffuse Glow. This time the filter looks very different.

The explanation is that Photoshop Elements (and Photoshop) use the foreground and background colors when applying the filter. This time go ahead and crank up the Graininess and adjust the Glow Amount until you get a nice glow on your image. Adjust the Clear value to suit and click Ok. Now you have a very different looking result.


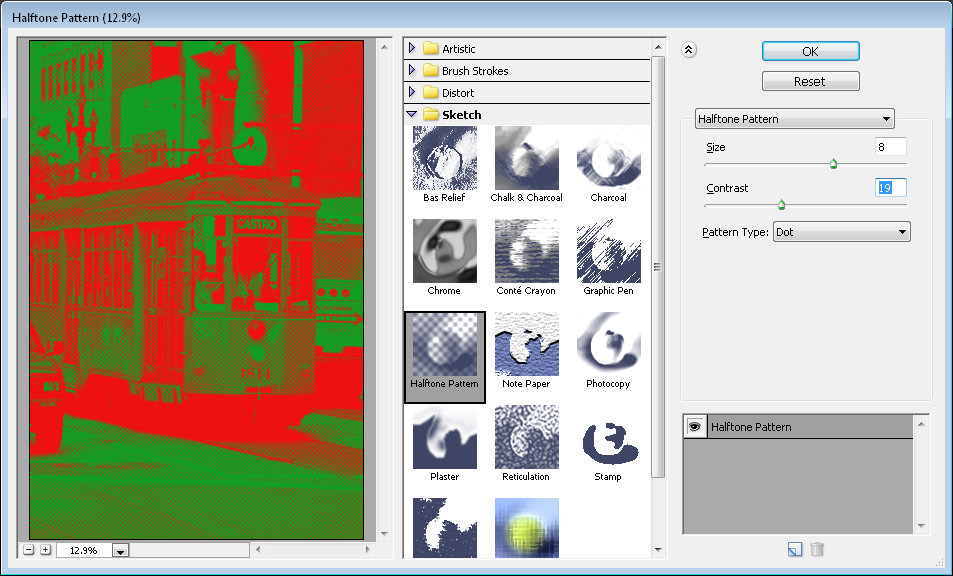
Understanding colors and filters
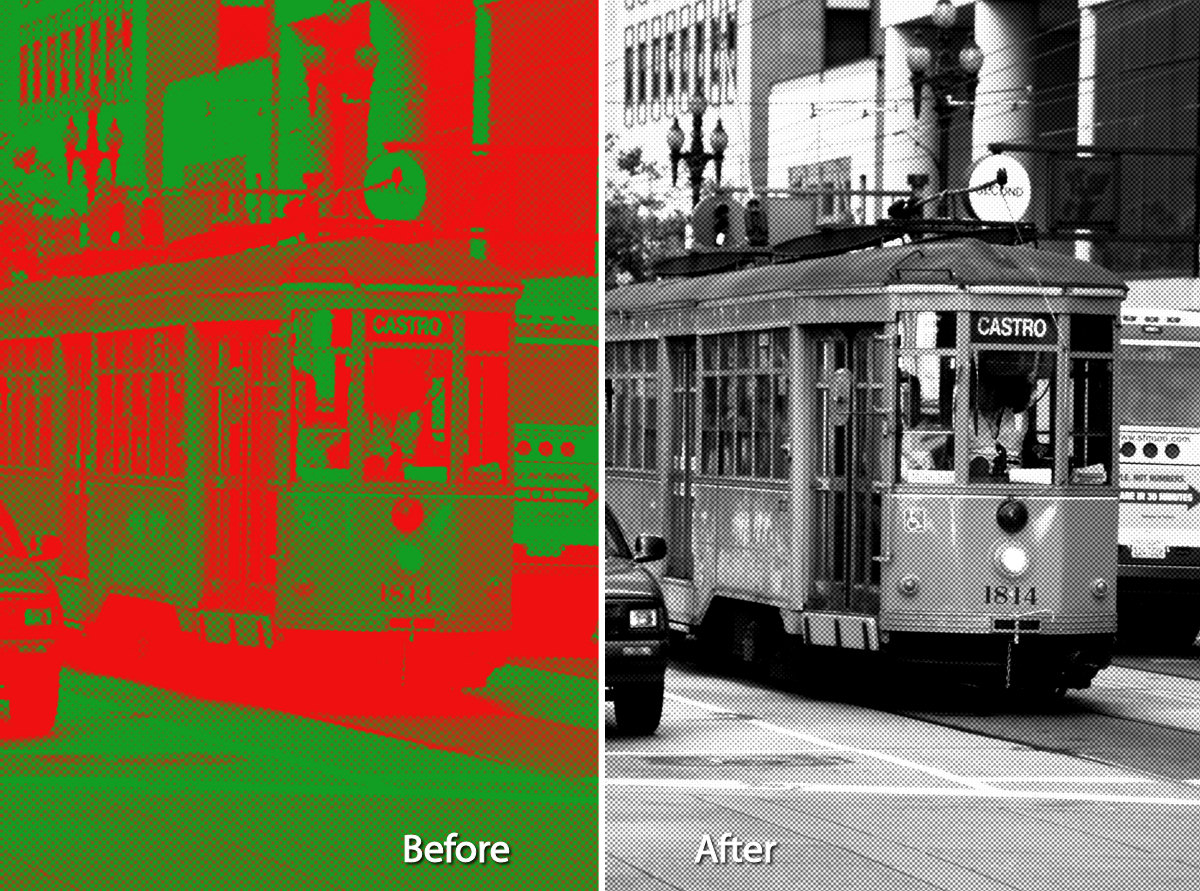
There are many of Photoshop Elements Filters that work differently depending on the current foreground and background colors settings. The Halftone Filter is one of these so, for example, if you have red and green selected the halftone pattern will appear in red and green - not always the desired look.


Instead, set the foreground to black and the background to white and apply the Halftone Filter using Filter > Sketch > Halftone Pattern. This time you’ll get something more like the result that you are looking for.


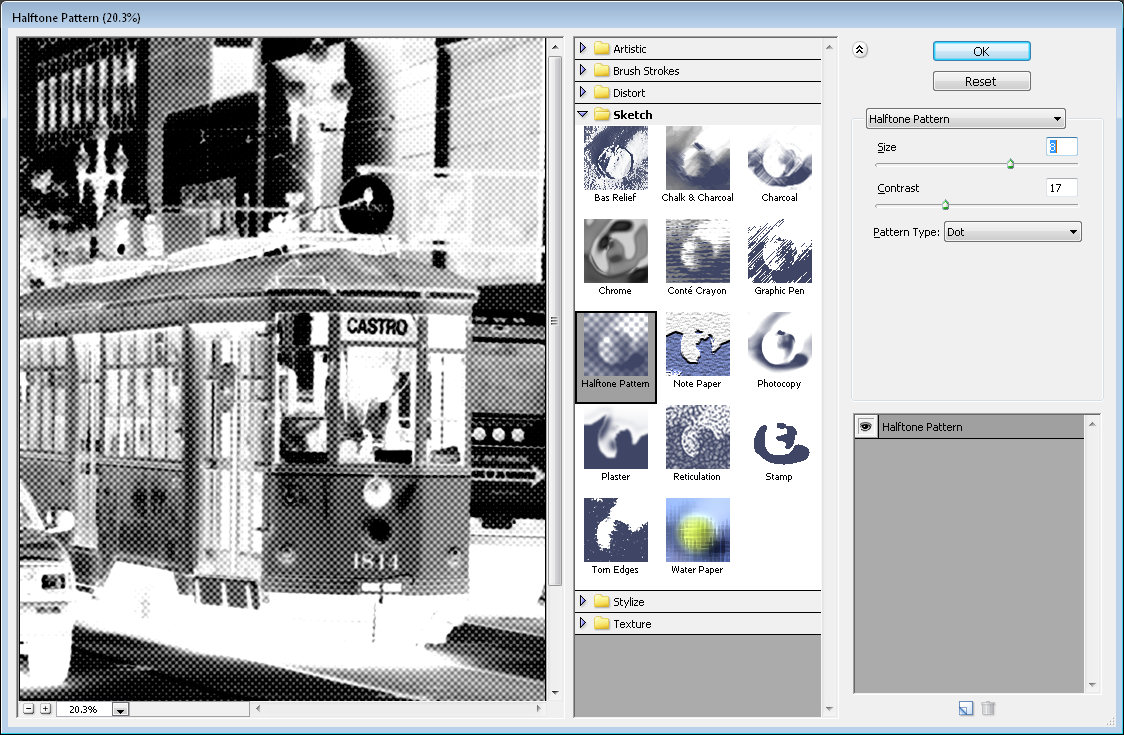
Switch black and white in the color swatch and try again - and the result is different and not so appealing.

What you need to know
The short lesson to take away from this post is that when you are applying filters in Photoshop Elements or in Photoshop the foreground and background colors that you have selected will have a big impact on how some of the filters work. In most cases the filters affected are the Sketch filters but others use the colors too.

Select the right color mix and the result is pleasing to the eye. Select the wrong color mix and you could be excused for thinking filters just aren’t for you.

Labels: , , ,

Thursday, September 17, 2009

Fixing keystone issues in Photoshop Elements


One issue you'll often encounter when you photograph tall buildings is a keystone effect caused by the angle at which you are forced to photograph from. The bottom of the building often looks wider than the top making it look out of proportion.

Most photo editing programs have tools for fixing keystone problems and, in this post, I'll show you two methods you can use in Photoshop Elements both of which work the same way in Photoshop.

Method 1: The Move tool


Step 1
The first method involves using the Move too. Start by converting the image Background layer to a regular layer by double-clicking it and click Ok.


Step 2
Enlarge the image canvas by selecting over it with the Crop tool and let go the mouse button. Then drag the crop handles outwards to select a larger area around the image and press Enter to fix the selection. You need to enlarge the canvas or the process will end up cutting off some of the image.


Step 3
Ctrl + Click on the layer thumbnail for the image to select the image but not the extra background.

Click the Move tool to select it and hold the Ctrl key as you drag on one of the corner handles. When you do this you’ll notice that you distort the image - you'll use this feature to straighten it.

If you choose View > Grid you can display a grid over the image to make it easier to see line everything up. Choose Edit > Preferences > Grid to change the grid dimensions if necessary.

Drag each corner of the image in turn and, if desired, rotate the image until it looks correct to you. When you are done, turn off the visibility of the grid (View > Grid) and Crop the image to remove any excess.

Method 2: The Correct Camera Distortion filter


Step 4
The second method uses the Lens Correction Filter. Select Filter > Correct Camera Distortion and the image will open in the filter dialog. From the Size dropdown list select Fit in View so that you can see the entire image.

Enabling the grid helps you ensure the image is squared off nicely. If necessary, drag on the Angle to rotate the image - in this dialog, the scrubby slider method works best so drag on the word Angle to adjust the angle (not the dial which tends to jump around a lot).

Select the Vertical Perspective slider and drag it to adjust the vertical perspective of the building. Choose Horizontal Perspective to fix horizontal perspective issues.


Step 5
The Correct Camera Distortion filter also includes a Remove Distortion slider which helps fix the sucked in or blown out effect you often see around the edges of an image caused by the curvature of the lens.

You can extend the canvas around the image by dragging the Scale slider to the left or drag to the right to crop the image.

When you’re done click Ok.

These tools also work well to fix an image of any rectangular object which is out of proportion - big or small.

Labels: , , , ,

Monday, September 14, 2009

Lightroom: Add a light source


The Lightroom Graduated Filter tool can be used to add a secondary light source to an image where one was not in existence when you shot it. This often works better to rescue an unexposed area of an image than, for example, applying a Shadow/Highlight fix in Photoshop.


This image is extremely dark on the right - a problem caused by capturing the carousel horse in broad daylight on a very sunny day..


After adjusting the Exposure in Lightroom and tweaking the image using the small Recovery, Clarity and Vibrance sliders the image is still dark in areas where I would like to see more of the detail in the underlying image.


To bring in some light on the right, click the Graduated Filter tool and drag the selector in from the right edge of the image so that the midpoint of the filter is over the point where the problem ceases to exist (around the level of the carousel horse's eye).


With the Effect Sliders visible, increase the Exposure and then, if desired, adjust the Brightness and Clarity sliders. Click Close when done.


In many cases you will find the Graduated Filter gives better results than, for example, the Shadows/Highlights filter in Photoshop shown here, and it's a lot less work.

If you'd like to learn more about using the adjustment tools in Lightroom, here are a couple of useful recent posts:

Fixing Blemishes in Lightroom

Spot fixing with the Adjustment Brush

More Adjustment Brush techniques in Lightroom

Labels: , , , ,

Friday, September 11, 2009

Batch Resize


While it’s relatively easy to write an Action to resize a series of images in Photoshop, it’s easier still to get Photoshop to do all the work for you. Photoshop comes with an image processor script that will open, resize and save a series of images for you - very quickly.


Step 1
Choose File > Scripts > Image Processor. The image processor dialog shows a simple four-step process for resizing the images.


Step 2
In Step 1 of the dialog, select to either resize the images already open in Photoshop (if you have them open), or click Select Folder and select a folder of images to resize. Select Include all Subfolders to include all subfolders of the selected folder.


Step 3
In Step 2 of the dialog select where to save the images. If you select Save in Same Location Photoshop creates a subfolder in which to save the images so you don’t have to worry about overwriting them. If a subfolder by the same name already exists with images with the same names in it, Photoshop saves to that folder but adds a sequential number to the file so you still won't lose your files. Alternatively, you can select a different folder for the resized images.


Step 4
In Step 3 of the dialog select the file type to save in. For the web Save as JPEG is the obvious choice. Set a Quality value in the range 0 to 12 where 12 is the highest quality and 0 the lowest. For better color on the web, select Convert profile to sRGB and ensure that Include ICC Profile at the foot of the dialog is checked so the profile will be saved with the image.

To resize the images, select the Resize to Fit checkbox and then set the desired maximum width and height for the final image. For example, if you type 300 for the width and 300 for the height, the image will be resized so that the longest side of any image, whether it be in portrait or landscape orientation will be 300 pixels. The images are scaled in proportion so they won't be skewed out of shape.

The Width and Height measurements do not have to be the same so you could, for example, specify a Width of 400 and a Height of 300 and no image will have a width greater than 400 or a height greater than 300.


Step 5
If desired you can save in another format as well by selecting its checkbox so you can save the same image in different formats and at different sizes in the one process. You can also select to run an Action on the images, if desired.

When you’re ready, click Run and the images will be automatically opened (if they are not already open), resized, saved and closed.

To see your resized images, choose File > Open and navigate to the folder that you specified the images to be saved to. If you chose to save as JPEG, the images will be in a subfolder called JPEG, for PSD in a folder called PSD and so on.

So whenever you need to resize a lot of images for uploading to the web, for example, the Photoshop Image Processor script makes the job almost painless.

Labels: , ,

Tuesday, September 08, 2009

Smart scaling with Content-Aware Scale


New to Photoshop CS4 is its Content-Aware Scale tool which allows you to transform an image in a way that you’ve never been able to do before in Photoshop. The technology itself has been around for some time and you may have been familiar with the website rsizr.com which offers content aware scaling as an online service. However, the feature is now built into Photoshop making it a readily accessible tool for images large and small.

In this post, I’ll explain how to use content aware scaling and how to protect areas of your image from being distorted in the process.


Step 1
To see the tool at work open an image in Photoshop CS4 (this feature is not in other versions of Photoshop), double-click the background layer to turn it into a regular layer and choose Edit > Content-Aware Scale.


Step 2
Notice the sizing handles on the image. Drag from one side inwards and watch what happens as you do so. You’ll find that the image shrinks in size, but most of the information in the image is still there - the image is made narrower but key elements in it are not squashed up.

If your image includes people, click the person indicator on the toolbar so that it is not pressed in - when the indicator is flush with the toolbar the option is selected. This protects people by recognizing skin tones and ensuring that they are not distorted by the effect.


Step 3
You can also protect elements in the image using an alpha channel mask. This technique is handy if you have areas of the image that you want to retain at the expense of other areas and it can also be used to protect people in the image.

Make a rough selection around the area that you do not want to be affected by the scale effect. A good tool to use is the Lasso tool - select an area and hold the Shift key to make a second selection over another area, if necessary.

Choose Select > Save Selection, type a name for the selection, such as detail mask, make sure that the Channel is set to New and the operation is set to New Channel and click Ok. Press Ctrl + D (Command + D on the Mac) to deselect your selection.


Step 4
Now choose Edit > Content-Aware Scale and from the Protect dropdown list on the toolbar, select the mask you just created. Scale the image and notice that the masked areas are protected from being damaged as the image shrinks in size.

Content-Aware Scaling is a handy way to change the aspect ratio of an image. For example, you can turn a landscape image into a square image and close up the space between people in a photo if they are a long way apart. It also works in reverse and you can use it to make an image larger. You may need to do some work with the clone tool to repair small areas of the image damaged as the result of the scaling but typically the tool does a very good job.

If you don't have Photoshop CS4 then head, image in hand, over to rsizr.com and give the online tool a try. Here is an earlier post I wrote on the Rsizr tool.

Labels: , , , ,

Monday, September 07, 2009

Centering a layer in Photoshop

Often you will have a layer in a Photoshop image that needs to be centered in the document.

To do this, first make sure that you have a full size layer that is a regular layer, not the background layer. If necessary, convert the background layer to a regular layer by double clicking on the background layer and click Ok.

Now Ctrl + Click on the background layer which is the full size of the image. It should have marching ants around it. With this layer selected, click the layer that you want to center. The marching ants should be around the entire image but the selected layer should be the one you want to center.

Select Layer > Align Layers to Selection > Vertical Centers to center the smaller layer within the edges of the large one.


Repeat and choose Layer > Align Layers to Selection > Horizontal Centers to center them horizontally. The second layer is now centered in the middle of the main ima

Labels: , , ,

Saturday, September 05, 2009

Working with Virtual copies in Lightroom


The Virtual copy feature of Adobe Photoshop Lightroom lets you experiment with multiple editing options for an image without duplicating the original image. So, for example, if you have an image that you think would look good either with its color enhanced or rendered in black and white you can apply both fixes to the same image to see which you like best using virtual copies. No only will you see both versions in Lightroom, you can export each as a different image and you can work with them independently of each other.

Follow these steps to see virtual copies at work:


Step 1
Inside Lightroom locate the photo to adjust in the film strip, right click it and choose Create Virtual Copy. In the film strip you will see both images and, when you select them, you will see they have the same file name. If you have the Info Overlay displayed it too shows the same data for both images.


Step 2
Once you have created the virtual copy you can edit it independently of the original and compare the results. You can also make additional virtual copies and each behaves independently of the original but is, in reality, the same image.


step 3
To view the two images side by side, return to Library view, select both the image and the Virtual copy and click the XY button above the filmstrip. This shows the two images side by side.

Tip
One problem with virtual copies is determining which is the original and which is the copy. You will need to do this, for example, if you want to delete the virtual copy leaving the original in place.


To delete a virtual copy, right-click the version of the image that you think is the virtual copy and choose Delete Photo. If it is the virtual copy you will see the dialog prompt "Remove the selected virtual copy from Lightroom?" - click Remove to delete it.


If the selected version was not the virtual copy you will see the prompt "Delete the selected master photo from disk, or just remove it from Lightroom?". This tells you that the selected image is not the virtual copy but the original. Click Cancel if you do not intend removing both the original and the Virtual copy(ies) from Lightroom or from your disk.


If you use Virtual copies a lot you can configure the Info Overlay to show you which image is a copy. To do this, choose View > View Options and click Show Info Overlay. Reconfigure one of the info sets to include not only the File Name but also the Copy Name. The original image will display the filename only and virtual copies will display the filename and Copy 1 (or Copy 2).

Labels: , ,

Wednesday, September 02, 2009

Sunbursts in Photoshop

Following on from the post on creating silhouettes in Photoshop, here is how to create fun sunburst images to put behind them.

Step 1
Start by adding a new layer to your image by choosing Layer > New > Layer.

Click the Pen tool, ensure the Paths option is selected on the options bar and draw a single triangle.

Do this by clicking where the point will be at around the middle of the image, then click above this and slightly to the left to create the first of the sides, hold the Shift key and then click to the right to create the base and then click again over the original point to finish. You now have a triangle path.

Step 2
View the Paths palette; click the Load Path as a Selection button at the foot of the palette.

Set the foreground colour to your choice of fill colour and press Alt + Backspace to fill the shape with this colour.

Press Ctrl + D to turn the selection off.

Step 3
Click on the layer itself, choose Layer > New > Layer Via Copy then choose Edit > Transform > Rotate to display the rotation tool options.

In the Reference Point Location block select the bottom middle of the nine boxes. Set the angle to 15 degrees or some value that divides evenly into 360 and click the Commit Transform button.


Step 4
Select Layer > New > Layer Via Copy and then Edit > Transform > Again.

Repeating these two commands or pressing the shortcut keystrokes Ctrl + J and Ctrl + Shift + T lets you repeat the copy and transform task and, in a few keystrokes, you will have a piece of custom art. When you're done, merge all the layers except the background layer.

Here is how I created my silhouette background:

Control + Click on the flattened sunburst layer and select the Gradient tool. Select a yellow/orange radial gradient and fill the shape with it by dragging from the middle of the shape outwards.


Add a second new layer and drag it to the bottom of the layer stack. Fill it with the same gradient but this time drag from outside the image to the middle to reverse the gradient.

The music staff is created using a pen line – I drew a single wavy line using the pen tool with the Paths option selected.

Display the Paths palette and click on the Work Path layer.

Click the Brush tool, set it to a small hard brush, set the foreground colour to black and click the Stroke path with brush icon at the foot of the palette to add a brush stroke to the pen line.

Move the line using the Path Selection Tool and repeat the process to add a stroke to this path. Repeat until you have five lines in total.


I finished by adding a few musical notes using shapes from my Photoshop shapes collection.


You can download free music shapes from http://myphotoshopbrushes.com/custom_shapes/id/2033 if desired.

This time use the filled pixels option to fill the shapes as you draw them. I blended both drawing layers using the Color blend mode and then added the silhouette.