Articles | Photography Blog | Office Tips Blog | about me | e-mail

Helen Bradley - Photoshop and Lightroom tips and techniques

Tuesday, June 30, 2009

Lightroom: More Adjustment Brush techniques

You just gotta love the Adjustment brush in Lightroom 2. It makes Lightroom a great tool for quick fixes and, honestly, I've used Photoshop a lot less since I started using Lightroom. I love the combination, Lightroom is fast and so smart and Photoshop is there for when I need specialist effects. So, on to today's post...

In an earlier post I talked about using the Adjustment Brush in Lightroom 2 at a simple level - sort of Adjustment Brush 101. In this post I’ll show you some advanced features of the adjustment brush which help you make multiple adjustments to the image at one time and to do so more easily. Consider this Adjustment Brush 102.
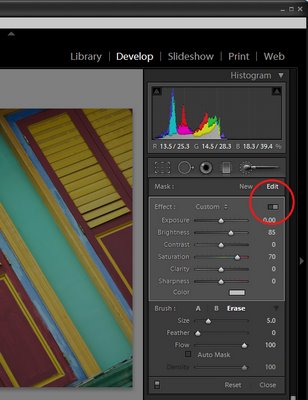

In the Develop module, when you have the Adjustment Brush selected there is a switch that you can click to switch between Button and Slider mode. In button mode you can adjust one of the Exposure Brightness, Contrast, Saturation, Clarity and Sharpness settings at a time. In Slider mode, you can adjust any one or more of these options.


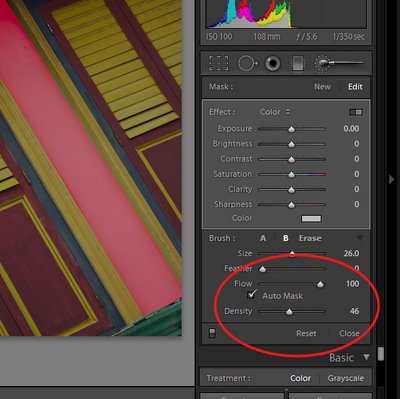
In the Brush area of the panel you will see an AutoMask option. When this is enabled, you can paint around the inside edge of an area and the AutoMask feature will mask the area ensuring your brushstrokes don't go over the edge. This works best on areas where the edge is distinct and recognizable. When you paint, make sure you have the main part of the paint brush inside the area you want to effect.

To toggle between AutoMask being on or off as you paint, hold the Control key as you paint (Command on the Mac).
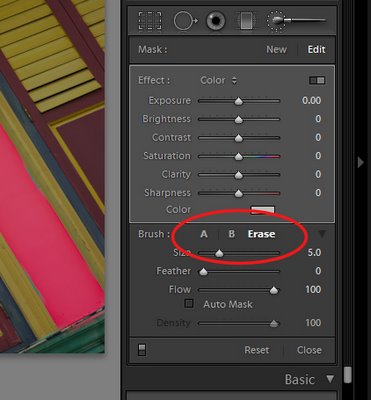

In the Brush area you will see two brushes, A and B. You can switch between the two by clicking on the A or B indicator. Each brush has its own Size, Feather, Flow and Density settings, and AutoMask can be enabled for either or both of the brushes. Having two brushes lets you configure each differently and switch easily between the two.

Each brush can be switched into the third brush mode - Erase mode by holding the Alt key (Option on the Mac) as you paint with either brush.

Setting the brush size defines the area of the brush and it is the central circle which you see when you are painting. The Feather amount adds an additional softness to the brush which is shown by the second outer circle. A hard brush has a Feather of 0 and it shows as a single circle.

Flow specifies the flow for the brush which can be set to less than 100 so you can build up an effect gradually by painting over an area multiple times. The Density slider adjusts the opacity and controls the maximum opacity of the brush strokes. So, if you have Flow set to a low value and Density to 50, the maximum opacity that the brush can reach regardless of how many times you paint over an area is 50.
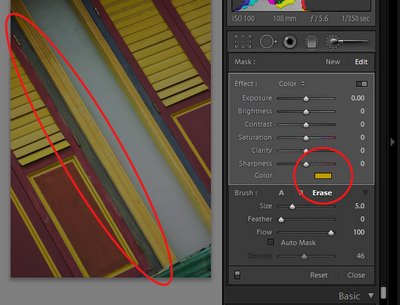

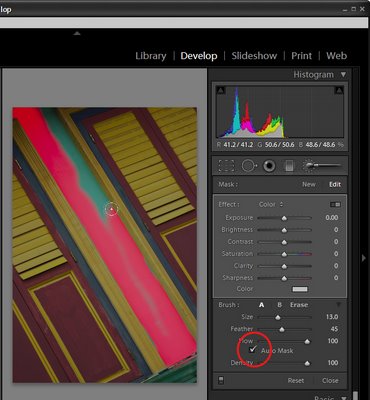
In the Effect area is a Color option which allows you to paint over an image with a color of your choice. To do this, select the color to use and then paint over the area to apply it to. You can use this to colorize a black and white image or, as I've done here, paint over a dark blue area with yellow to make it dark green.

Tip: Interested in learning more about Lightroom? Check out my post on understanding Clarity, Vibrance and Saturation in Lightroom 2.

Labels: , , ,

Friday, June 26, 2009

Photoshop Elements: Spot sharpening with a faux layer mask


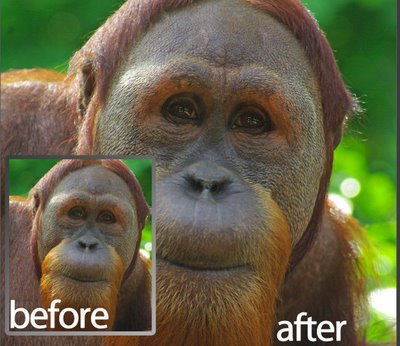
One of the features on the wish list of most advanced Photoshop Elements users is Layer Masks. It is one of the key features that separates Photoshop Elements from Photoshop - but it doesn’t have to be that way. It is possible to create faux layer masks in Photoshop Elements if you know how – and today, I am going to show you how.

One of benefits of this approach to creating faux layer masks in Elements is that it uses features built into Elements and it doesn't rely on a third party plug-in so it works with most versions of Photoshop Elements.

A bit of background
While Photoshop Elements doesn't support layer masks for regular layers, it does provide them for all its adjustment layers. This faux layer mask solution takes advantage of this by forcing an adjustment layer's layer mask to behave like a layer mask on a regular layer just as it does in Photoshop. The trick is to apply an adjustment layer to the image which does nothing to the image at all – so you get the benefit of the layer mask but without forcing any unwanted change on the image. Once you've done this you have a layer mask you can borrow.

In this step by step example, I'll show you how to use the mask to paint some additional sharpening onto an image. What I'll do is oversharpen an image – well beyond the level of sharpening which the image should have and then I'll remove the sharpening with the mask and paint is back over selected parts of the image – again using the mask.

While this technique is shown using Photoshop Elements you can use the same technique in Photoshop – only in Photoshop you won't need to use the fake mask as you can add a layer mask to the oversharpened layer itself.


Step 1
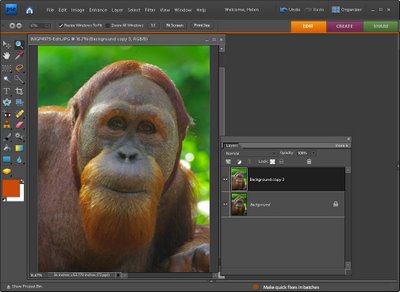
Finish editing your photo. If you have multiple layers, create a flattened version of image by selecting the topmost layer and press Ctrl + Alt + Shift + E (Command + Option + Shift + E on the Mac). This creates a new composite layer without flattening the layers.

Duplicate this layer by right-clicking it and choose Duplicate Layer. You should now have two identical image layers at the top of the layer stack.


Step 2
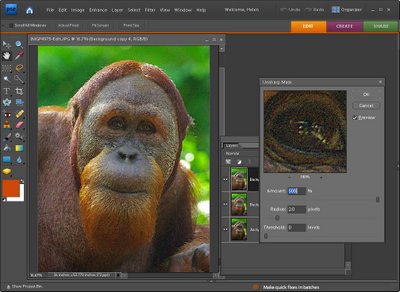
Select the topmost layer and choose Enhance > Unsharp Mask and apply excessive sharpening to the image. What you want is an extremely oversharpened image. You don’t want halos, just very heavy sharpening. In this example, I’ve used a radius of 2, a threshold of 0 and the full amount of 500. Click Ok.


Step 3
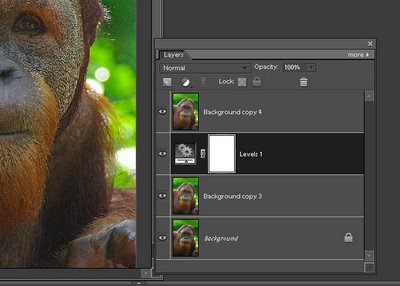
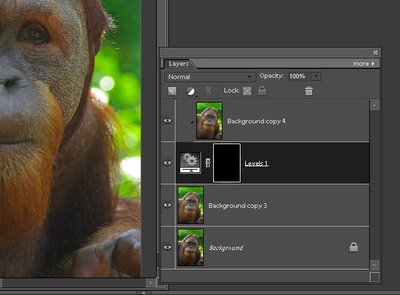
Add an adjustment layer by choosing Layer > New Adjustment Layer and choose either Levels or Brightness/Contrast or Hue/Saturation – you need an adjustment layer that doesn't do anything to the image if you don't alter its settings. Click Ok and don't make any changes to the adjustment layer settings. Drag the adjustment layer so it sits between the two image layers.


Step 4
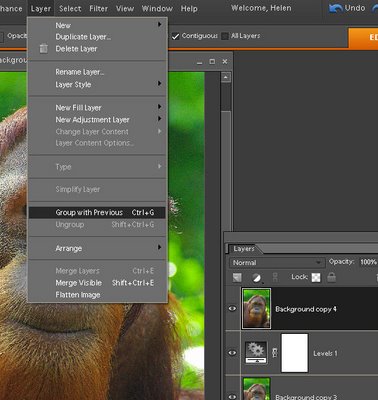
To create the fake layer mask, select the topmost oversharpened layer and choose Layer > Group with Previous. This attaches the oversharpened layer to the adjustment layer below limiting the effect of this layer to the area that is white in the adjustment layer mask – right now that is all the top layer.


Step 5
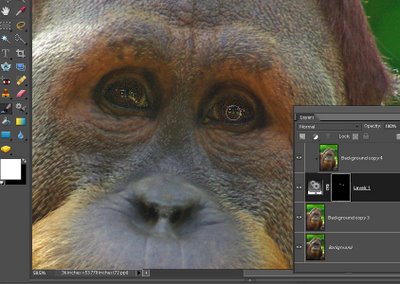
Click on the adjustment layer and click on the layer mask thumbnail which is the white box on the right side of the layer in the Layers palette. You should see a double border around it indicating that it’s selected. Fill this mask using the paint bucket tool with black. The entire oversharpening effect is immediately removed from the image.


Step 6
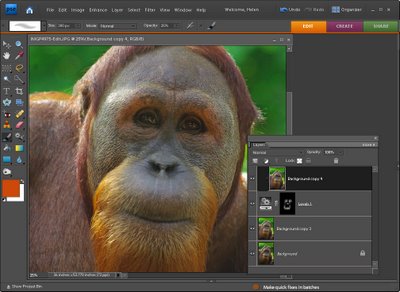
Select the brush tool and select a soft round brush. Adjust the opacity to around 25 percent and select white as the foreground color. With the layer mask thumbnail still selected, paint over the areas of the image that you want to apply additional sharpening to. In my case, I wanted to oversharpen the eyes on the orangutan.


Step 7
As you paint, the sharpening effect will built up – if you paint somewhere by mistake, set black as the foreground color and paint out the mistake. This is how a mask works - you paint with black to remove the effect on this layer (in our case you paint in black to remove the sharpening effect form the layer above because the two layers are grouped together) and you paint with white to reveal the effect.

When you are done, you can flatten the image or save it as a layered PSD file.

In future whenever you need to use a layer mask in Photoshop Elements, simply apply an adjustment layer to the image, drag it under the layer it should control and group the layers together.

Learn more: If you're interested in learning more about sharpening, check out my very popular post on Understanding the basics about Sharpening.

Labels: , , , ,

Monday, June 22, 2009

10 Ways to Create, Copy, Blend, Merge and Save Photoshop Layers


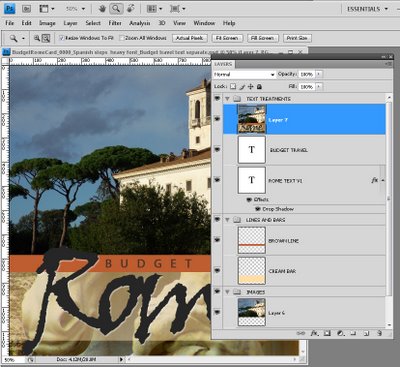
Layers are a key tool to working successfully in Photoshop. Here are my 10 best tips for working with them:

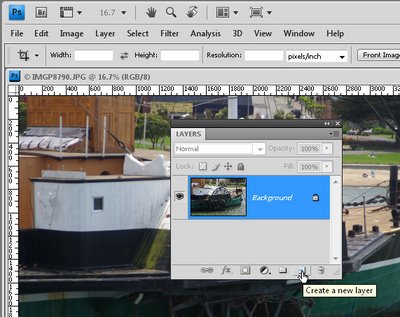
1 Create a layer in Photoshop
To create a new layer in Photoshop, choose Layer > New > Layer or, better still, click the Create a New Layer at the foot of the Layer palette.


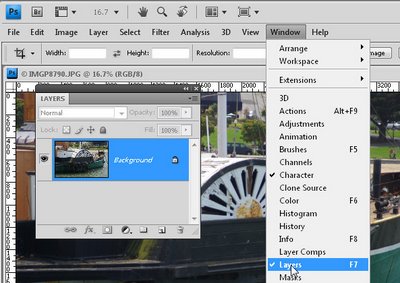
2 Display the Layer Palette in Photoshop
Ok, let's go back a step first. If you can’t see the layer palette choose Window > Layers and it will show on the screen. Pressing F7 does the same thing.


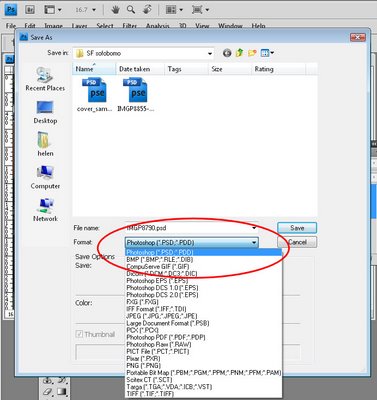
3 Save Photoshop layers
Layers are saved in Photoshop when you save the Photoshop file in a format that supports layers. The simplest format to use is the PSD format. Choose File > Save As and choose PSD from the Save As Type dropdown list.


4 Merge layers in PS
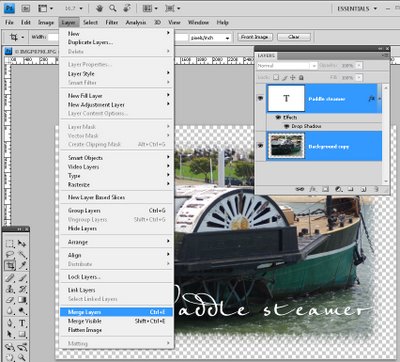
When you have multiple layers in a Photoshop imager you can merge them to flatten the file in a number of ways. You can save the image using a file type that does not save layers such as JPG. You could also use Layer > Flatten Image to flatten the image to a single layer or you can select all the layers by Control + Clicking on them (Command + Click on the Mac) and then choose Layer > Merge Layers to merge them all to a single layer but retain the layer opacity. In this case, you should save your image as a PNG or PSD file or some other format that saves transparency if you want to keep this.


5 Blend layers
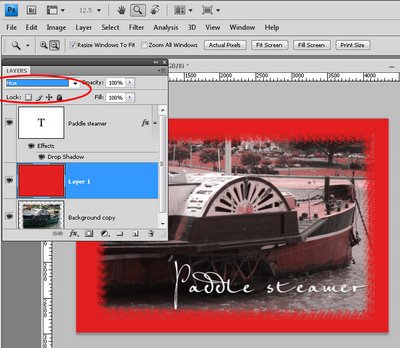
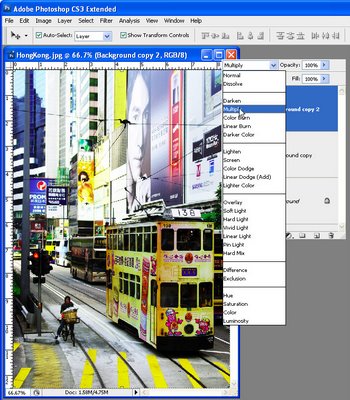
You can blend one layer into the layer below by using the blend modes in the layer palette. Select a blend mode from the blend mode dropdown list to change the way the layer interacts with those below. Some blend modes work when the two layers are the same and some don’t. They also work if you have two different layers.


6 Rotate a layer
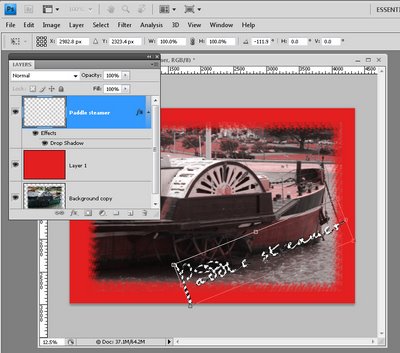
You can rotate a layer inside a Photoshop image by Ctrl + Clicking on the layer thumbnail to select the layer itself (use Command + click on the Mac). Choose Edit > Transform > and choose Rotate 180, Rotate 90 CW or Rotate 90 CCW to rotate in a fixed rotation. Alternatively, select Edit > Free Transform and you can rotate the layer by dragging on it. When you’re done, press Enter to confirm the rotation. To turn off the marching ants, press Ctrl + D or choose Select > Deselect.


7 Unlock a layer
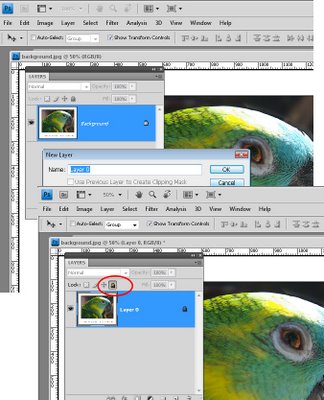
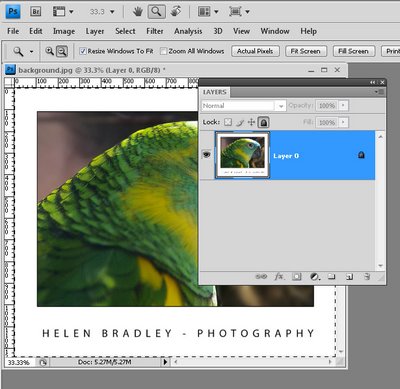
To unlock a layer (provided it is not the background layer) select the layer and click the Lock all Icon in the layers palette - if the layer is locked, this unlocks it.

To unlock the background layer, double-click the layer and press Ok to turn it into a regular layer which unlocks it automatically.


8 Copy a layer
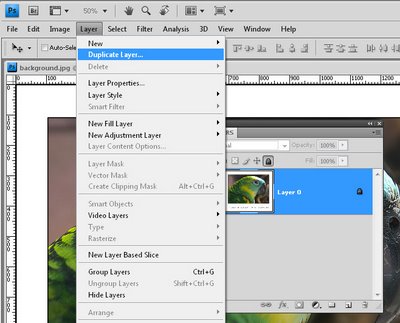
To copy a layer in Photoshop, select the layer and choose Layer > Duplicate Layer and press Ok. Alternatively, working in the layer palette drag and drop the layer onto the Create New Layer icon to create a copy of it.


9 Select a layer
To select a layer in Photoshop, hold the Ctrl key on a PC (Command on the Mac), and click on the layer thumbnail in the layer palette. This selects the layer. You will see the marching ants around the layer.


10 Flatten layers and still keep them
I call this my "have your cake and eat it too" tip. To flatten all the layers in an image to one layer but still keep all the layers intact, click on the topmost layer in the Layer stack and press Control + Alt + Shift + E on the PC or Command + Option + Shift + E on the Mac.

Labels: , , , , ,

Wednesday, June 17, 2009

Photoshop - keep a log of everything you've done

How many times have you created a neat effect on an image using Photoshop and then wanted to duplicate the effect on another image? The problem is that unless you’ve taken notes about what you've done, it is often difficult if not impossible to remember exactly the steps you took to get the final image.

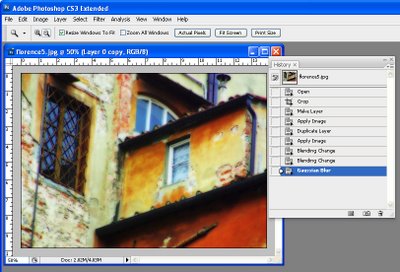
While Photoshop has a History feature this is of limited use. One problem is that, by default, Photoshop only stores 20 history states so, if you've performed a lot of steps they may not all appear in the list. The second problem is that, even if you have configured Photoshop to store a large number of history states, all you see in the History panel is a brief description of what you did to the image such as Gaussian Blur, Apply Image, Blending Change and you don't see the actual settings used.


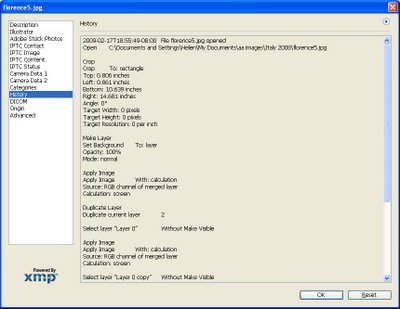
The History panel in Photoshop lists the basics of what you've done but not the detail.

Here are some ways to improve on the basics and keep a log of your work:


Step 1
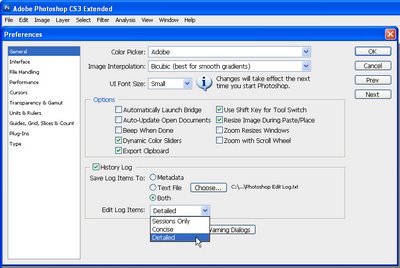
Before you start work on an image choose Edit > Preferences > General and select the History Log checkbox. You can select to save log items to the image Metadata, to a separate text file or to both. If you select either Text file or Both you’ll be prompted to enter a file name and a location to save the file to. Do this and click Save.

From the Edit Log Items dropdown list select Detailed. Sessions records only the time you spend working on a file, Concise records the Sessions information and the detail from the History palette and Detailed records the detail about the changes – it's Detail you need.


Step 2
Now, when you work on an image, the detail is stored in the text file, the Metadata or both, depending on the setting you chose.

If you chose to store the data in a text file you can later open the text file with a word processor or a text editor such as Notepad on the PC.

If you chose to record the history in the image metadata choose File > File Info > History and you can read details of the edits you made to the image in the dialog. Use this information to perform the same steps on another image


Tip
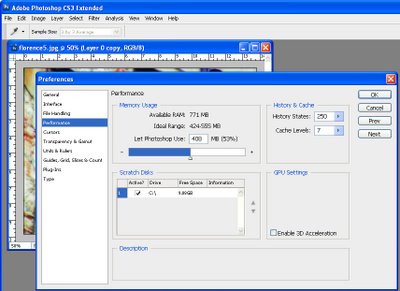
To configure Photoshop to store more than the default 20 history states, choose Edit > Preferences > Performance and set the History States value to a higher number. You should note that this History information is available in the History palette and only while the image is still open – it is lost when the image is closed – unlike the Log data which is stored permanently.

Labels: , , , ,

Sunday, June 14, 2009

Orton Effect - Photoshop


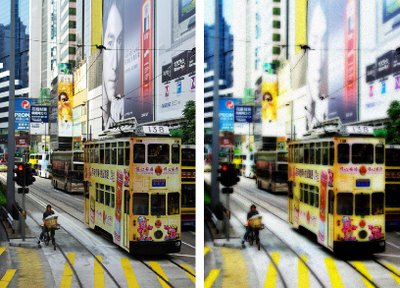
Photoshop gives us tools we can use to create effects which previously could only be obtained in the darkroom using images which were captured specially. One such process is the Orton effect named after photographer Michael Orton. This process results in a somewhat surreal image which has a slightly out-of-focus look while retaining lots of edge detail.

In the darkroom this effect is created using two images one of which is slightly out of focus and both of which are slightly overexposed. Sandwiching these together and taking a print yields a photograph similar to the one above.

Thanks to Photoshop we can create this effect from a single well exposed image and create the overexposed and soft focus looks digitally.

Here is how to create this Orton effect on an image from your collection:


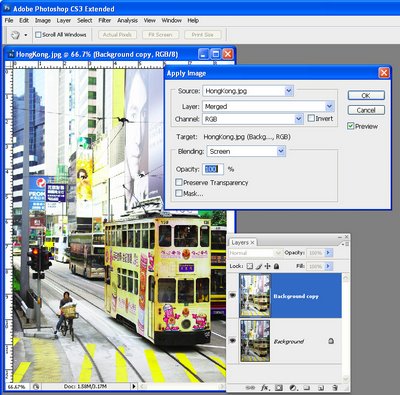
Open the image, right-click the background layer in the layers palette and select Duplicate layer. With the duplicate layer selected choose Image > Apply Image, select the Screen blend mode and click Ok. This applies the image to itself in screen mode which is the same as creating an additional duplicate layer, setting this layer's blend mode to Screen and then merging the two layers. The benefit to using Apply Image is that you do it all in one step.


Duplicate this layer and set its blend mode to Multiply. This has the effect of cancelling out the lightening effect from applying the Screen mode.


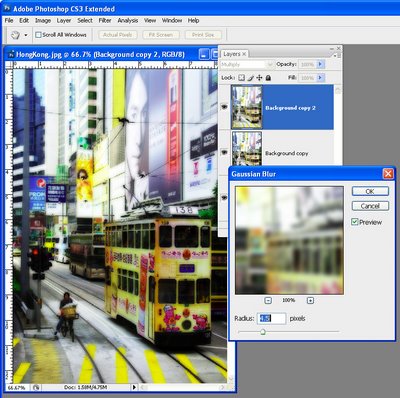
With this topmost layer still selected apply a blur to it using Filter > Blur > Gaussian Blur. Select the Preview checkbox so you can see the result on the image. Adjust the blur Radius to your choice of value – I used 4.5 but choose the best for your image. Notice that, if you create a very large small or very large blur, the effect all but disappears.


If the image isn’t light enough, return to the middle layer and repeat Step 1 to apply the image to itself again in Screen mode.

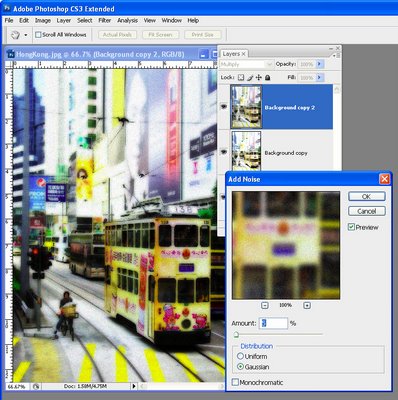
Then, if desired, add some noise to the image to give it a grainy look. To do this, choose Filter > Noise > Add Noise. Disable the Monochrome checkbox, click Gaussian and adjust the amount till you get a slightly grainy feel to the image.

The result is a soft focus image which still has lovely detail in the edges and it is a process well suited to being used with portraits as well as landscapes and cityscapes.


Using Photoshop Elements?
The same effect can be achieved in Photoshop Elements but you will need to perform step 1 the long way. To do this, duplicate the Background layer twice, set the top layer's Blend Mode to Screen then choose Layer > Merge Down to merge it to a single layer. There is no Apply Image command in Photoshop Elements.

Labels: , , ,

Sunday, June 07, 2009

Understanding the basics of Sharpening in Photoshop


Sharpening is one of those everyday tasks that most photos can benefit from. In this post I'll explain what sharpening is, when you should perform it and how to do it. The information here, although it is explained using Photoshop, is relevant to all photo editing programs.

Sharpening does as its name suggests and sharpens the image making it look crisper and making the edges in the image more distinct.

In the darkroom the process is achieved by taking one negative and a slightly blurred positive image, sandwiching these together and making a very quick exposure of this sandwich. Then the exposure is completed using the negative. The resulting image has sharper and crisper edges than it would have had if the blurry (unsharp) mask image had not been used. The typical sharpening tool used in Photoshop and other graphics programs is named after this traditional darkroom process and is called the Unsharp mask.

In a graphics editor the Unsharp mask works by creating small halos along the edges in the photo. These halos enhance the contrast between the edges and the surrounding pixels making the edges look more obvious and giving the image a crisper and sharper look.

Here’s how to sharpen an image using the Unsharp mask:


Step 1
Sharpening should be done at the end of the editing process so finish doing all your edits to the image before you sharpen it.

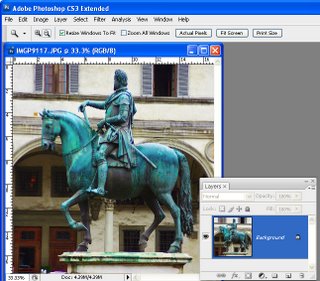
Now create a flattened version of the image either by flattening or merging all the layers or press Ctrl + Alt + Shift + E (Command + Option + Shift + E on the Mac) to create a flattened layer at the top of the image. The Unsharp mask works only on the current layer so you need to have the image on a single layer for it to do its work.


Step 2
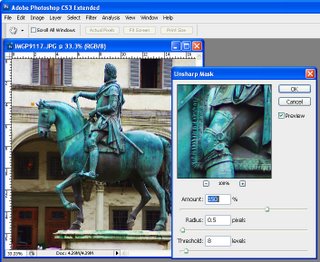
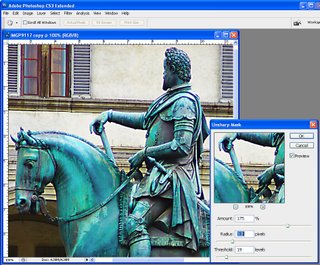
Choose Filter > Sharpen > Unsharp Mask. Set the Radius to somewhere between .5 and 1. This sets the width of the halos which are applied along the edges in the image – the smaller the radius, the smaller the halo and 0.5 – 1 is ideal – this is not always a situation where the more is better!

Set the Threshold to around 10. The Threshold value determines how edges are found – the higher the value, the more different adjacent pixels must be to be considered an edge so less of the image will be sharpened. A small value means that smaller differences in pixel values are considered an edge so more of the image is sharpened. The risk with a small Threshold value is that it can add noise to the image by enhancing edges in places where you don't want to see them.
The Amount setting controls how much contrast is added to the edges – a higher value means more contrast and a more obvious sharpening. Start by setting this value to around 150.


Step 3
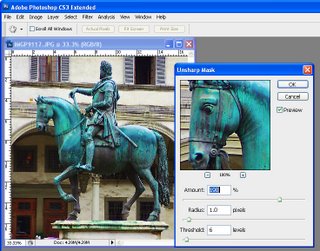
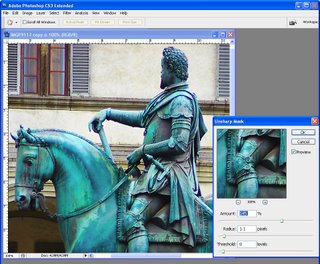
Take a look at your image and adjust the sliders from this starting point until you see more detail in the edges in the image but not so much that you see unattractive halos around the edges.

Typically, if you have an image with a lot of very fine detail you can use a very small radius value (so the halos are small) and a correspondingly high Amount value (so that the halos can be seen to sharpen the image). On the other hand, if you have an image without a lot of fine detail can use a larger radius say, 1 – 1.5 or more (which gives larger halos), and a smaller Amount setting because the halos will be bigger and more visible anyway.

Adjust the Threshold value so you get sharpening in the areas you are interested in being crisper but not so that it results in unwanted noise in the image.


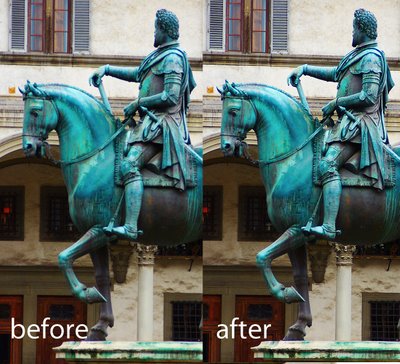
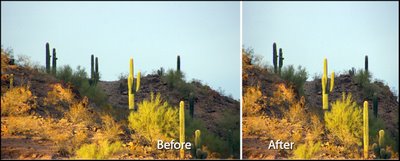
This image is nicely sharpened – you can see the crisper edges.


This image is over sharpened – notice the unsightly halos around the edges.

Tips
It is generally advisable to view the image at 100% when you are sharpening it so you can see the effect on the image. You can do this by sizing the image to 100% before launching the Unsharp mask tool. Alternately, use the 100% preview in the Unsharp mask dialog –click on the preview to see the unaltered image so you can compare it with the preview..

When you are sharpening for printing you can generally sharpen more heavily than you should do for onscreen viewing.

There are other sharpening tools available in Photoshop CS2 and later which do an even better job of sharpening than the Unsharp mask. I'll look at these tools in a future post. For now, regardless of which graphics editor you use, you should have an Unsharp mask tool and it should work in a similar way to the Photoshop Unsharp mask shown here.

Labels: , , , , ,

Wednesday, June 03, 2009

Rsizr - Image scaling on steroids


While Photoshop, Lightroom and Photoshop Elements can resize images for you, only Photoshop CS4 supports content aware scaling. I'll talk about this new feature in Photoshop in another post but if you're interested in playing with content aware scaling and you don't own Photoshop CS4, check out Rsizr.com

Rsizr resizes images by removing the unnecessary content from them or by stretching neutral areas of the image to make the picture bigger. It’s worth a visit just to see it at work.


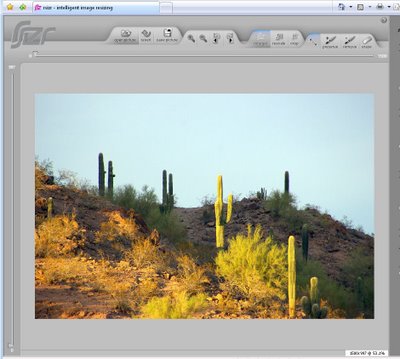
Start by uploading an image that you want to resize. This should be a JPEG, .PNG or GIF file with a height and width of less than 2,880 pixels – in practice, so you can see what's going on quickly, upload an image sized smaller than this.

Once the image appears in the dialog you will see tabs with buttons for various functions including the File Function tab, View functions, Resize and Retarget functions.


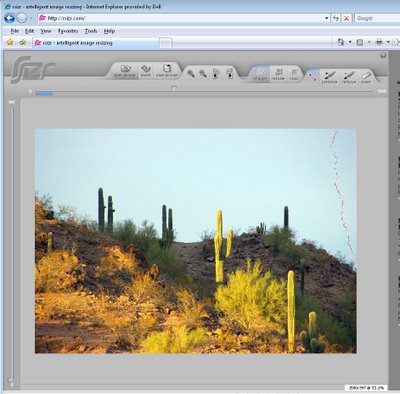
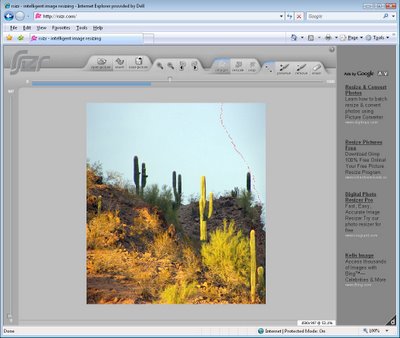
The program uses a seam carving technique to remove portions of the image. To get started drag the horizontal slider in the top of the window in to the size you want the image to be resized to. Click the Retarget button and watch as the seams are created (they're the red marks you can see in the image) and the file shrinks in size.


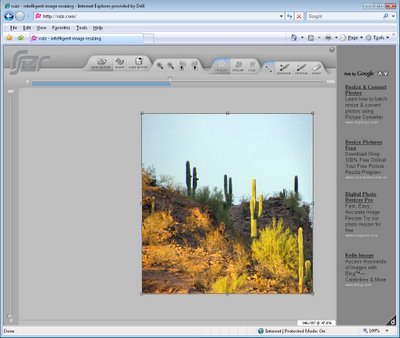
Once the seams have been created, you will see a set of sizing handles around the image which you can use to resize the image either to make it wider or narrower.


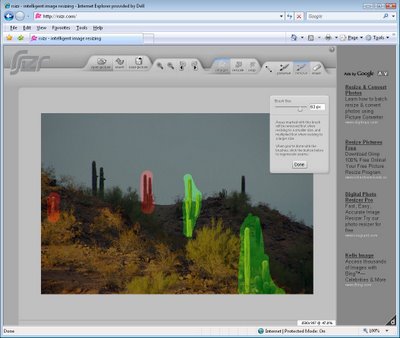
You can protect areas of the image or mark them for deletion by clicking the Preserve or Remove indicators on the retarget functions tab and paint over the area to keep or remove.


You might do this, for example, if you see some distortion in the resizing process and want to protect key portions of the image.

The rescale and crop tools are similar to what you're used to using in your photo editing software - it's the retarget option which is unique.

If you're interested in learning more about seam carving technology, visit: www.seamcarving.com to see a video describing it.

Stop Press! There is a cool plug-in available for the Gimp which brings content aware scaling/seam carving to the Gimp. For more information and to get the download, check here: http://liquidrescale.wikidot.com/ and note that the Gimp version is called Liquid Rescale! Just in case you thought there weren't enough ways to refer to the same thing.

Labels: , , , , , ,